
Unit 8 - Final Major Project
Statement Of Intent
Section 1: Review (Approx 150 words)
Explain the journey you have gone through in this past academic year. What were the greatest milestones of your learning? How do you feel you have developed as an artist? Explain how you have decided on your specialism – was it a turning point in a specific project? Have you always identified as a specific type of artist? If so, how have you developed and furthered your skills to get to this point? Explain how your journey has ended up here, with this idea, for this final major project.
When I started the course in September 2016, I did not find it very difficult to complete the tasks. I was already very familiar to the software packages that we had to use for the units. Although some units were quite time consuming such as Units 6 and 7, which included Maya, I still managed to complete them. The greatest milestone of my learning was probably completing my Unit 7 because I put a lot of time into filling my website with as much information and screenshots as possible. In addition I felt that I developed my Maya skills more by learning techniques to add more detail to my modelling. I enjoyed the units involving Maya and modelling and I would say that that is my specialty; therefore I have decided to model a Zeppelin in Maya for my final major project.
Section 2: Project Concept & Proposed Artist Statement (Approx 300 words)
This is where you explain your FMP project idea and concept. Be specific about what you intend to communicate and what you hope to achieve by producing this work. How will your work engage or affect your audience and what will they discover by interacting with or viewing your work? Describe the theme/concept of your work – is it based on fact or fiction? Are you creating or reacting to a mood, an emotion, a sense of atmosphere or sensation? What is the title of your Project? What will you work towards producing? What will be your final outcome?
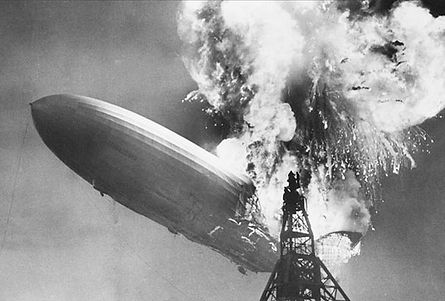
I want to model a World War One Zeppelin within Maya as my final major project and in addition use digital compositing in Maya to put the model behind an image of a city to look as if it was an actually photo (using the same compositing process in Unit 6). I have done some research into the history behind the Zeppelin and how it affected media. Almost all the Zeppelins created initially all naturally crashed or got destroyed such as an event referred to as the Hindenburg disaster. The Hindenburg disaster (1937) happened when the LZ 129 Hindenburg caught flames while trying to dock with the mooring mast (a structure used to allow the docking of airships). During World War One the Zeppelin was seen as a very intimating battleship because its size, no other airship at the time looked as scary as the Zeppelin. This was the Zeppelin’s greatest power as it could create fear and intimidation to the enemy just by its appearance. However the Zeppelin was actually quite a weak airship when used in battle and in general because it caught on fire a lot. The Zeppelin was filled with hydrogen, which is a highly flammable, and storms/strong winds affected the Zeppelin badly. So as a result it also gained this reputation. I want to talk about this more during my final major project but in my actual project I want to present the Zeppelin as passenger airship (also used for normal travel) flying in the sky instead of a battleship for war. The Zeppelin was actually best used for normal passenger travel however Ferdinand von Zeppelin (1990) wanted it to be a battleship used for war, but this was not the reality of the Zeppelin or its strong suit.
Section 3: Methods (Approx 150 words)
Refer to any techniques and processes you intend to use. Describe the range of media and materials relevant to your project and how you may use them to explore and develop your ideas. Include aspects of studio practice, workshop procedures or the use of particular equipment and software etc. In the timetable, provide an indicative timescale for your project and indicate the manner in which you intend to divide your time in order to investigate, develop, produce and evaluate your project appropriately. This should be a meaningful plan to you and should be personalised to your project.
The techniques and processes I intend to use are Maya as the software package so I can model the Zeppelin and also composite it, and I will also use various websites for researching the history and reputation of the Zeppelin. As mentioned earlier I will also research paintings, a rock band called Led Zeppelin (1968) and other forms of media during the time of the Zeppelin so I can talk about its affects on the community. By researching this it will give better justification to my final project and where I got my inspiration. For the compositing I may potentially use Photoshop to slightly edit the image before putting into the Maya. However my main software package will be Maya for the modelling process. In addition to the research I will be talking about the Imperial War Museum where a model of a Zeppelin can be found, I could also potentially visit the museum for first hand research.
Section 4: Evaluation (Approx 150 words)
How will you critically review and analyse your work and determine if it is successful? How will you identify directions for ongoing development? Do you have a method to record the critical response to your ideas? How do you propose to assess the success of your Final Major Project and what will be your methods of evaluation?
One of the ways I will review my work after it is finished is to compare it to what I wanted the outcome to be research initially. I will compare and analyse all aspects of my final project as see if there were any alterations or changes I had to make due to any problems during the course of the project. I also want to compare my model of a Zeppelin to normal images and paintings of it to identify if there is enough detail in my model. I will also type up a short critical review of my own work after each section of the unit on the website. At the end I will type up a longer review of the entire thing just like I did with some of the previous units, however I want to include the final project as well in this evaluation.
Proposed Research Sources and Bibliography (Harvard Format)
What are the influences, starting points and contextual references and why are they relevant to your ideas? Indicate the subject areas you intend to research and the likely sources of information including any museums, specific locations, performances, etc you plan to visit. You should explain the value of this research and then compile an accurate bibliography correctly acknowledging all references including texts, periodicals, websites and video/DVD’s etc
I will use various history-based websites as research when talking about the Zeppelin’s history. As mentioned earlier I will use forms of media that was influenced by the Zeppelin such as music, articles about Zeppelin crashes, news about the Zeppelin attacks and public warning posters of Zeppelin sightings.
The Hindenburg Disaster (1937), the LZ 129 Hindenburg caught fire and was destroyed.
Ferdinand Von Zeppelin (1990), Inventor of the Zeppelin and creator of the LZ1 airship.
Led Zeppelin (1968), An English rock band formed in London.
Project Idea/Concept & Unit Aim
This Unit will require you to make use of skills, knowledge and understanding developed in previous units to complete and art and design project. This unit will also provide an opportunity to explore in greater depth an art and design activity your own choice. It will develop and extend subject knowledge, realising creative potential though personal research, experimentation and communication of ideas.
Project Idea: For my final major project I will model a the World War One Zeppelin airship in Autodesk Maya and then use compositing to put the model of the Zeppelin behind an image of a city. This will be rendered into a still image.
Throughout my website I will carefully analyse every step of the making process of my project. I have already talked about the aim of the unit and my project idea. I intend to then talk about the analysis of my project idea which will involve a step by step process how how the project will be made, such the modelling of the Zeppelin all the way through to the finished project. I will also talk about some of the resources I will use to help me with project such softwares packages and websites. Lastly, I will mention any other techniques, methods and processes.
In the next section I will talk about the requirements and parameters that need to be disclosed before starting the project. This section will split into two smaller sections, one talking about the requirements/ parameters for the research and second section talking about the requirements/parameters for the modelling and compositing.
The final section in terms of planning will time management. I intend to show a copy of my FMP timetable from statement of intent in this section. This timetable will show the time it will take me to produce each section of the project. This will also include resources needed for the project.
In the fourth section is where I begin the research of Zeppelin history and development. This involves background information about the Zeppelin such as the inventor and inspiration, roles of the Zeppelin throughout history (and its effects) and the evolution and development of the Zeppelin such as various versions of it and problems that were encountered.
In the next section I am continuing my on my research on influence of the media. This involves all forms of media that the Zeppelin had some influence on. This includes music, posters, public warnings and art. After talking about the historical influence of the Zeppelin and I will then talk about its modern day influence, such as its recreation for business purposes and for showcasing.
The next section will be about research of the end of the Zeppelin era. I will talk about the reasons to wh the Zeppelin came to and end.
After, is the section where I begin to discuss the actual modelling of my Zeppelin in the modelling analysis. In this section I will discuss how I will create the basic shape of the Zeppelin first then create the smaller details of it.
Next is the discussion of the structure analysis, in this section I will talk about the specific areas of the Zeppelin that I will model. Following that is the design and sketch, which involves a close look at my own drawing of the Zeppelin I will model.
Finally comes the actual modelling itself. In these sections from now on concerning the modelling, they will be split into multiple sections as I am creating the Zeppelin in parts as said earlier. In this section I am modelling the basic shape of the Zeppelin and uploading screenshots with short explanations, discussing techniques used.
This section relates to the previous one as I will be refining and smoothing the basic shape of the mesh I just modelling in the previous section.
The next three sections of modelling will be the elevator flaps, gondola and the engines.
The next step is adding extra details in my Zeppelin model. I will explain how I want to make my Zeppelin model more unique by adding more details to the model.
After all the modelling is done and typed up I will start the texturing process section. In this section I will also do research into Zeppelin materials and colours.
Once the the Zeppelin is complete I will start the next section which will be the compositing process. This will show the process of putting the Zeppelin model behind an image of a city in Maya.
When the whole project is complete, the next section will be the final renders. In this section I will include textured Zeppelin renders, ambient occlusion renders, wireframe renders and compositing renders.
The next section is the project comparison. This will include the comparison of my work to the work of others, so comparing my project to real-life art based around of the Zeppelin.
The final section is the project evaluation. This is essentially a self-evaluation of my project just like in previous units. I will talk about what I found easy/hard and much more.
Analysis Of Project Idea

When I begin the creation of my project I will first model the Zeppelin, I plan to use tutorials online and the skills I have developed to create this in Maya. I want to add as much detail in the Zeppelin model as possible. Next I will have it textured, as said previously I will do research into the materials used to create the Zeppelin and I will texture my model with much realism. After all the modelling is done I will find an image of a city from the internet as use the compositing process in Maya to implement my model of the Zeppelin in the image, just like in unit 6. The lighting, gamma and contrast can all be adjusted after when this is done.
Some of the resources I will need would be firstly Maya for the modelling of the Zeppelin. This will be my 3D software package of choice to model the Zeppelin. I will also use a variety of websites to help me type up the history of the Zeppelin. All the website I use will be referenced via hyperlink. I have already used most of the techniques, processes and methods in previous units and I will continue to use them in this project.


Requirements & Parameters


Research Requirements
The requirements for my research would be history websites about the Zeppelin, historical posters and forms of media. On the right are examples of how the Zeppelin influenced the media, one of them is a public warning poster and the other is advertising the Led Zeppelin rock band. These are the times of material I will be researching and discussing. Most of my research will be talking about the history, development and life cycle of the Zeppelin so many websites will be used to help me with this. I will be linking referencing the websites I used throughout.
Modelling Requirements
For the modelling requirements I will use reference images for the modelling in Maya, city images for the compositing process and textures for the Zeppelin model. Before modelling I will properly analyse the modelling process in detail. On the right I have already done some research into already made 3D models of Zeppelins, I will continue to do this to use as inspiration.


Time Management
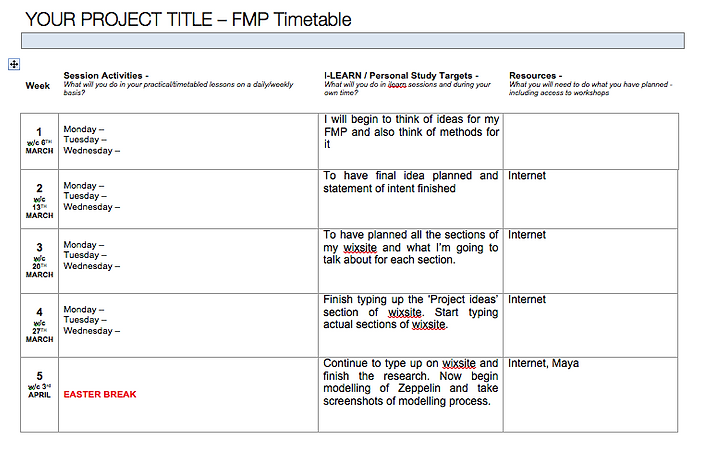
Below is my timetable for my project it explains in detail what I will be doing each week and when I will get things completed by.


Research - Zeppelin History & Development

Ferdinand Von Zeppelin
Ferdinand Von Zeppelin was the inventor and designer of the Zeppelin airship. He served in the Prussian army in 1866 and was commended for his bravery. He retired from the army in 1891 with position of lieutenant-general. Zeppelin returned to Germany and then founded an airship factory. He was really interested in the designs of airships and he devoted the rest of his life towards this. Zeppelin began developing concepts and designs for an airship that was light and steerable.
Over the next few years, Zeppelin dedicated himself to the study of aeronautics and also continued designing concepts for a lighter airship. In 1894, the German government rejected all Zeppelin's proposals for a lighter airship however this did not stop him from investing all his time and money into creating airships. By 1898 Zeppelin had a team of 30 workmen who helped him assemble his first airship. The main idea of the invention was that it was a hydrogen-filled blimp shaped structure that carried inside a steel skeleton.
References:
The First Zeppelins
1990 - LZ-1 (Luftschiff Zeppelin 1)
Although Zeppelin and his men had finished designing their first airship, Zeppelin wanted to wait until summer of 1990 to test it. So in July 1990, the LZ1 lasted around 20 minutes in flight time whilst travelling over a lake. However it then crashed while trying to land. Zeppelin discovered that the LZ1 was too heavy and lacked engine power and speed, this made it difficult to control in windy weather.
Zeppelin attempted to make some adjustments to the LZ1 and two more additional flights were made. This did not impress the military and they did not want to support it finically. As a result Zeppelin was out of money and he was forced to dismantle the LZ1.

1907 - LZ3 (Luftschiff Zeppelin 3)
The LZ3 had even greater advances in controllability, power, speed, range, and payload. The LZ3 had large fins on the back as seen on the image on the right, this allowed more control and stability for flight. The LZ3 was actually very successful in comparison to the last two variations as it made a flight for more than 8 hours during the summer of 1907. The fins on the back provided a huge stability advantage that both the LZ1 and LZ2 lacked.


1906 - LZ2 (Luftschiff Zeppelin 2)
The LZ2 made its first and only flight in January 1906 and had significant improvements made to it. Zeppelin had replaced it with better engines which allowed to move quicker and be able to control more easily. The LZ2 was largely improved and it presented itself with a lot of technical developments because of engineer Ludwig Durr. During its first flight it was forced to land due to engine failure and was later destroyed by a storm the following night.
1908 - LZ4 (Luftschiff Zeppelin 4)
The LZ4 was influenced by the success of the LZ3. The LZ4 kept the fins at the back and they were slightly adjusted to help give even more control and stability during flight. During a test flight in the summer 1908, the LZ4 flew for over 12 hours to Switzerland. This success brought national attention to Zeppelin and the German government was impressed by it and even agreed to support it financially if it could fly for 24 hours. Zeppelin accepted this challenge and the LZ4 departed again for a 24 hour trial.
Roles Of The Zeppelin
Passenger Travel
The Zeppelin was also used for other means, in this case it was used for normal passenger travel. In 1909 the LZ6 Zeppelin became the first Zeppelin for commercial use and passenger travel. There were many different Zeppelins for civilian travel, mainly for business. The LZ7 was flown in 1910 and was a civilian, passenger-carrying airship, unfortunately it crashed in a forest the same year. Another passenger airship was created called the LZ8 was constructed for DELAG– German Airship Transport Company. It was flown in 1911 but was damaged and could not be repaired by strong wind.
Transporting Supplies
The Zeppelin was also very good at transporting military supplies. The Zeppelin could carry men and ammunition of large amount, this was something normal aircraft couldn't do at the time.
References:
https://www.wired.com/2014/10/world-war-i-zeppelins/
http://www.zeppelinhistory.com/rigid-airships-history/timeline-of-zeppelins/

Surveillance
Another use for the Zeppelin was for spying and surveillance. They were used to spot submarines which were difficult to be seen, however in the air it could be seen more easily. In addition one that were carrying radios could convey information to commanders on the ground. They also provided a measure of aerial protection for convoys.

Crashes & Disasters
There were many famous crashes and disasters during the time of the Zeppelin. The Zeppelin was filled with hydrogen which was highly flammable so if a Zeppelin caught fire it was quickly spread and destroy the entire thing. Helium was also an option and was less flammable however due to limited supply, hydrogen was the preferred choice.

Hindenburg Crash
In May 1937 the LZ 129 Hindenburg passenger airship burst into flames near a mooring mast. It is still unknown to how the Hindenburg randomly caught fire and ended up spreading. The Hindenburg was scheduled to fly around Europe and North America however it ended up crashing in New Jersey. The disaster killed 35 people and it marked an end for the Zeppelin era.
References:
http://www.zeppelinhistory.com/list-of-zeppelins/hindenburg-disaster/
http://www.zeppelinhistory.com/list-of-zeppelins/lz-4-zeppelin/
1908 - LZ4 Echterdingen Crash
After the success of the LZ3, the german government said to Ferdinand Von Zeppelin that if he could get his airship to fly for 24 hours then they would support it financially. Zeppelin accepted this offer and started working on the LZ4. In August 1908, the LZ4 was on its test flight and it ended up crashing near Echterdingen as it caught fire after braking loose.
Research - Influence On The Media
In general the Zeppelin was terrifying looking airship as no other for of flight travel was the size of the Zeppelin. In this section I will be discussing how the creation of the Zeppelin influenced the media. I will be discussing past and modern day influences such as posters, music and video games.


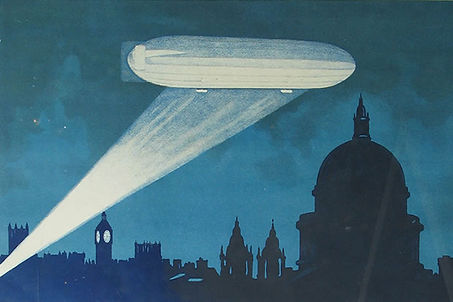
The two images of the left were public warning posters used by the British during WW1. Its intention was so the public would easily recognise the difference between German and British aircraft. The Zeppelin's greatest strength to me was that it looked very terrifying and intimidating, and that was the mina reason to why these posters were created.
Warning Posters


Led Zeppelin
Led Zeppelin was a British rock band from 1968 - 1980. The name 'Led Zeppelin' was thought of by the members when they were having a conversation about there chances of going down like a lead Zeppelin. They then took the name of 'Led Zeppelin' from this conversation.
References:
http://www.imdb.com/name/nm0496389/bio
http://www.mylearning.org/zeppelin-raids-in-the-humber-during-ww1/images/2-4739/
Game References
Many video games now that are based in WW1 present the Zeppelin in different ways. Below are some examples of how the Zeppelin is used and illustrated in modern day games.
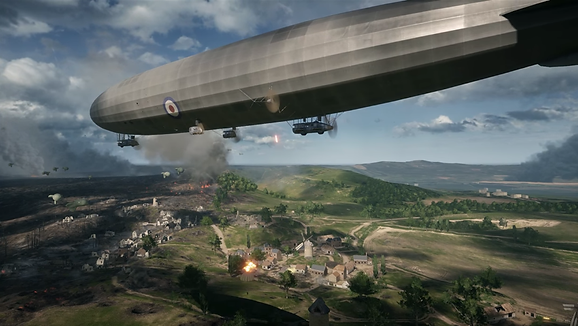
Battlefield 1 (2016)
In Battlefield 1 the LZ 30 is used to present Zeppelins of WW1. The LZ 30 was the first 'super Zeppelin' that belonged to the Imperial German Navy. It is the largest and most successful Zeppelin in the world. Battlefield 1 presents the Zeppelin exactly how it was perceived in WW1, as a terrifying airship that can take a lot of damage
The Saboteur (2009)
The Saboteur is set in a German-occupied France in WW1. In the game, Zeppelins are mainly used for surveillance and intimidation to show authority. Smaller Zeppelins are used in larger numbers to represent Nazi presence. The Saboteur presents Zeppelins as way of control rather than a killing machine for war.

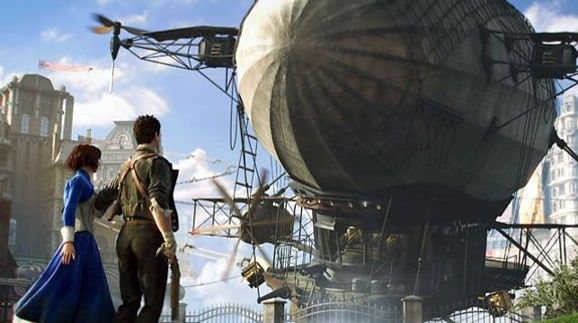
Bioshock Infinite (2013)
The Zeppelins in Bioshock Infinite are more fantasy with many exaggerated features. In the game they are referred to as 'Security Zeppelins' and handheld weaponry are ineffective against them. They are presented as a means of defence and air superiority in the game.
References:
http://battlefield.wikia.com/wiki/Airship_L30
Modern Day/Real Life Influences
Zeppelins are also still used in real life for business purposes such as advertising. They are not as big as the WW1 Zeppelins but can still attract a lot of attention due to its surprising nature. They are usually referred to as blips because they are smaller than the WW1 Zeppelins. Below are some examples of Zeppelins being used for advertising.


Paintings & Artwork
There was a lot of artwork created surrounding the Zeppelin throughout WW1. From researching most of the paintings and art is of Zeppelin air raids in London or of Zeppelins crashing and being destroyed. I think the reason for this is because the Zeppelin was both a success and a failure throughout its lifetime. The Zeppelin was very good at illustrating destruction, intimidation and control but it also proved weak because of how easily it cold be destroyed.

Zeppelin L15 Crashing Into The Thames
This first piece of art is a water colour painting from JS Riches, 1916. Its of a ship called the 'Olivine' picking up German crew after the L15 Zeppelin crashed into the Thames in April, 1916. It was hit by a shell from the British causing it to crash. All the crew were saved by the Olivine. As mentioned earlier this is a case where the Zeppelin was considered a failure, the fact that one shell fired b the British hit the Zeppelin caused the entire airship to go down. Zeppelins were successful in raids and bombing, however quite vulnerable to attacks. In addition because of the Zeppelin's relatively slow speed and large structure it wasn't good at avoiding attacks.
Zeppelin Bombing Warsaw
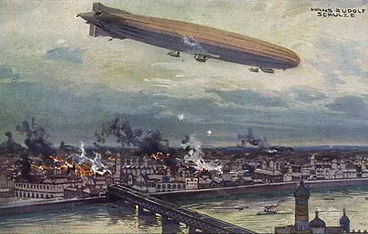
This painting is from Hans Rudolf Schulze, 1915. Its of a German Zeppelin bombing Warsaw in Russian-occupied Poland in 1915. At the time Warsaw was one of the biggest cities claimed by the Russians, so as a result is was considered a key territory for them. When the Germans attacked Warsaw it was devastating loss for the Russians and Warsaw fell to the Germans in August 1915.


LZ-129 Hindenburg In Frankfurt
The next piece of artwork is a postcard of the LZ-129 Hindenburg flying over Frankfurt, Germany. I have already mentioned what happened to the Hindenburg and how it was destroyed near a mooring mast. The Zeppelin obviously became a known icon as it was designed on postcards in Germany. Its influence allowed it to become known world wide because of the help of these postcards.
Zeppelin Stamps
These Zeppelin stamps were created by the Soviet Union in 1934. They were used for flights going to South America at the time. They were very popular among collectors and in my opinion it shows the influence of the Zeppelin in other countries, in this case the Soviet Union.

References:
http://www.mylearning.org/zeppelin-raids-in-the-humber-during-ww1/images/1-4739/
http://www.wwitoday.com/wwiScLocationDetail.php?id=72
http://meta-punk.com/2011/07/29/historic-zeppelin-postcard/
http://stampselector.blogspot.co.uk/2010/06/stamp-investment-tip-russia-1934.html
Research - End Of The Zeppelin Era
There were a few reasons to why the Zeppelin era eventually came to an end. Although the Zeppelin had a great psychological effect on the enemy in war, in general they were very unsuccessful in war. Below I have three reasons to why the Zeppelin era came to an end.

The Hindenburg Crash
The first reason to why the Zeppelin era ended was because of Hindenburg crash in May 1937. This marked the official end of the Zeppelin after WW1. People lost their faith and fascination in the Zeppelin and therefore it wasn't needed anymore. In addition people were afraid of using it because of this disaster and not to mention its known history of exploding in the air.
The Advancing Of Technology
The second reason to why the Zeppelin era eventually ended was because of technology getting better throughout the war. Both sides created better aircraft than the Zeppelin that was more effective and the Allies began getting more efficient with taking down Zeppelins. As a result the Zeppelin was removed from military use by the end of WW1.


The Treaty Of Versailles
The third and final reason to why the Zeppelin era ended was because of the Treaty Of Versailles. The Treaty Of Versailles was a peace treaty between both sides and within the treaty had conditions for Germany which included its military to be cut down and technology to be banned or reduced. The treaty banned the use or creation of Zeppelins for military or commercial use and all remaining Zeppelins were given to the Allies as reparations.
References:
https://www.cnet.com/uk/news/hindenburg-disaster-75-years-ago-abruptly-ended-zeppelin-era/
http://www.eyewitnesstohistory.com/zeppelin.htm
http://www.historylearningsite.co.uk/modern-world-history-1918-to-1980/the-treaty-of-versailles/
Conclusion
The Zeppelin was actually quite an original idea during WW1. No other airship at the time was the size of the Zeppelin and that's what made it special in my opinion. Its size gave it a huge psychological impact as the enemy would be afraid of its large intimidating structure. However I believe that the Zeppelin was too ambitious and quite ahead of its time and that's what caused it to fail in the end. Perhaps if it was created during a more technologically advanced period in time than WW1 it would have probably been more of a success. On the right is a YouTube video I found very helpful when typing up the research section of my project.
Modelling Research - Structure Analysis
I will now begin the modelling research phase of my project, which involves creating the Zeppelin in Maya. In this section I have researched the specific areas of the Zeppelin structure and how they can be made in Maya. This section involves having a close look at the design of the Zeppelin.

On the left side is an image that includes the basic parts of the Zeppelin structure. When I am modelling my Zeppelin I will not be copying the design of an already made Zeppelin as I want to add some uniqueness to my own. I will only be creating the outside of the Zeppelin which is composed of four main parts - the blimp-like shape (with the look of a rigid structure inside), the gondola, the engines and the elevator flaps. I will be going into more detail about the modelling o these individual parts later on.

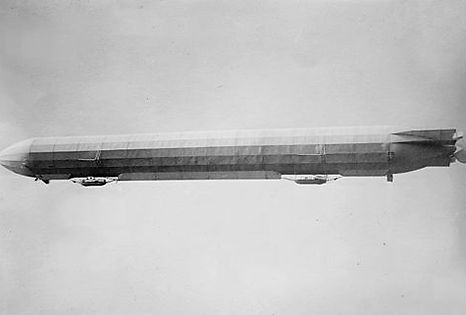
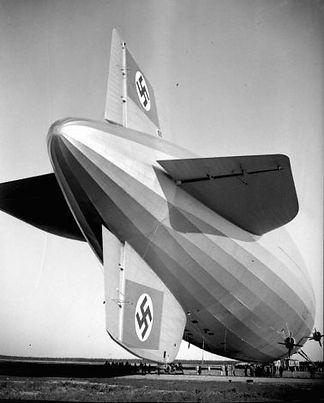
On right side is an image of the L30 Zeppelin which was the largest Zeppelin created. I will be referring to this Zeppelin in particular when I am modelling my own Zeppelin. The front of the Zeppelin stars out small and slowly expands into a cone-like shape, it then stays at the same width and get longer. Towards the end of the structure it comes in again and creates a pointy shape almost like a rocket.
Modelling Research - Design & Sketch

Below is a sketch that I drew of how I want my Zeppelin to look like. I looked mainly at the L30 Zeppelin for reference when I was drawing this as well as other designs. I plan to model this with the sketch as reference to make it as best as possible, however during modelling I may alter some aspects if I think they can be improved or if there are any problems that I encounter. During the modelling process I will mention any changes I make as I go along.
Maya - Modelling The Basic Shape
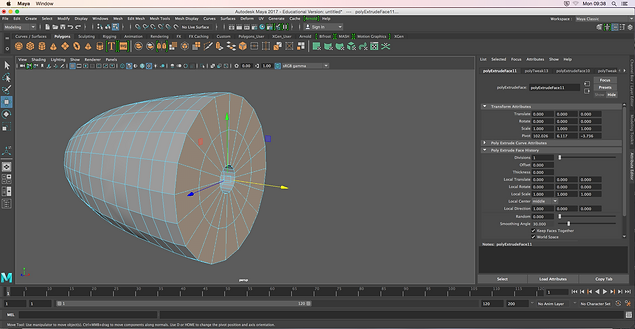
I began modelling the front cone shape from using a polygon pipe and I started raising the edges to it would eventually get bigger.

As you can see I have now formed a basic cone-like shape by initially extruding the faces outwards so it slowly expands and gets bigger and bigger.

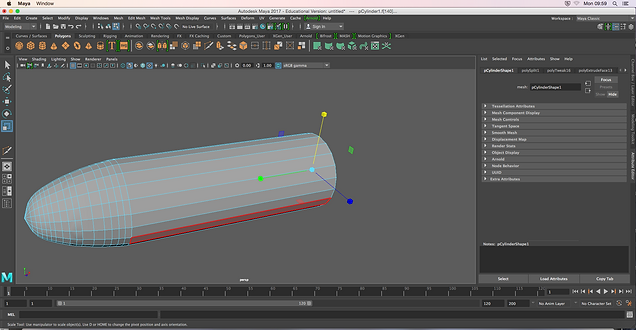
Once I was satisfied with the shape I had made, I then simply extruded the faces to create the main body of the Zeppelin. Now its is forming some shape.
The next step was to create the back end of the Zeppelin. As seen in my sketch, the Zeppelin has a pointy end to it. So I selected the whole of the front and duplicated it at the back. I then adjusted its shape slightly to make it more pointy, this allowed the front and back to be more easily recognisable before I create the elevator flaps in a later stage.


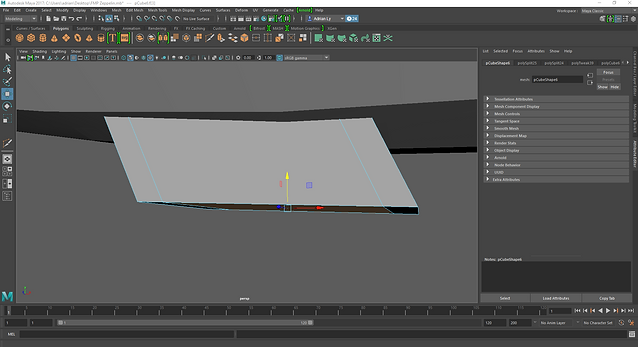
The next step as to continue to adjust the shape of the Zeppelin. I used the knife tool in to initially create more edges along the body of the structure so I could then raise and lower the body and create a curvy shape as seen in the screenshot. because of this process, its has gotten slightly shorter as a result. So i will now need to expands and adjust its length.

I then used the scale tool to adjust the length of the structure to my liking.


Next is simply refining and smoothing the shape of the body. It is important to create the best possible shape for the Zeppelin so this will most likely be an going process throughout the modelling phase.
Maya - Elevator Flaps
Below I have done some research into the design of the elevator flaps used on Zeppelins, although I am using my sketch as a reference image for my own model the images below do represent a rough design of how I want to model my elevator flaps.

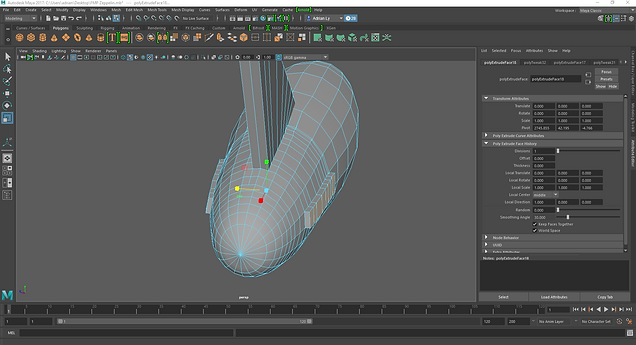
I began creating the elevator flaps by selecting a few faces at the back of the basic shape. Admittedly, I had to use the knife tool to create more faces at the back as the faces were not originally aligned. If I didn't do this then the elevator flaps would be misaligned. I then used the extrude tool to raise the selected faces.


The next step is step is to select the edges and start moving them downwards to create a triangular shape.
After I had adjusted the flap is create the best possible triangular shape, I continued to refine it by using the scale tool.


I then further adjusted it by moving the vertexes.
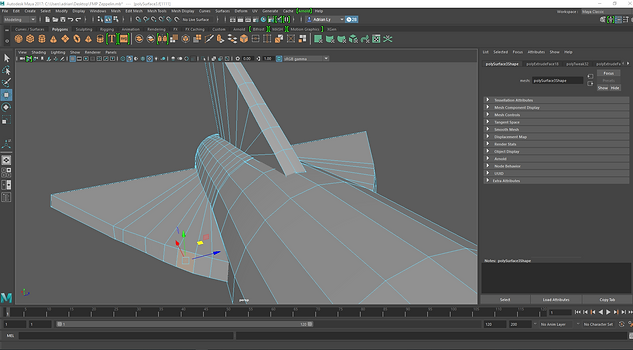
Once the top flap had been modelled I then moved onto the flaps on the sides. I began by selecting the faces either side and extruded outwards until it was the same length as the top elevator flap.

Then I had to create the triangular shape on both the flaps, I did this by selecting the faces are scaling them.
I now had the basic shape of the elevator flaps modelled on the Zeppelin.

Next I had to make small adjustments the elevator flaps such as straightening the edges so that they were aligned with each other. I also moved the elevator flaps on the side forward slightly so that all three flaps were the same size.
The next thing I had to model was the small rectangular parts that stick out at the back of the elevator flaps. At this point the flaps are finished and now small details are being made.


Firstly I used the knife tool to create two vertexes along side each other on all three flaps. Then I simply selected the outside edges and slowly brought it inwards to the centre, so the a small rectangle is sticking outwards.
The elevator flaps are now done and modelled. I also added a fourth elevator flap underneath to complete it.

Maya - Gondolas

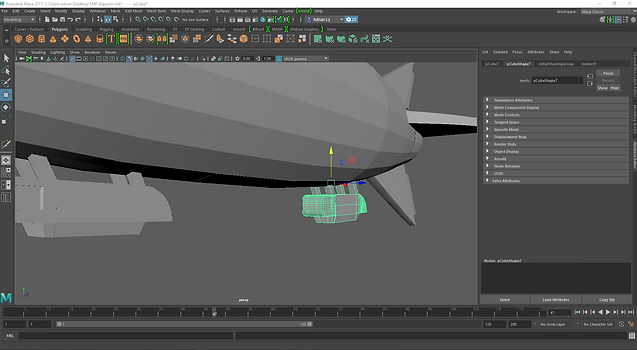
The nest step is to model the gondolas. I began doing this by creating a regular cube in and placing it underneath the Zeppelin.

Then I used the knife tool to create vertices either side of each other, this is the first step to creating the supports that will hold the gondolas. Next I shifted the entire thing side ways slightly to create more detail.


After I deleted the faces insides the cube. Now the gondola supports have more shape to them.
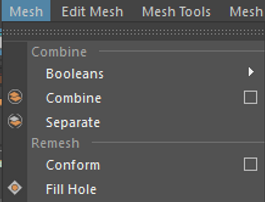
I then filled the inside by clicking 'Mesh' and 'Fill Hole'. By selecting two edges and using this tool it fills in the empty space.


Next I extruded the supports until I create a box-like shape underneath. As seen in my sketch the back of the gondolas is round, so I used the knife tool to creates more edges and then used them to create a rounded corner.

I then did the same thing to the front of the gondola.


Next I extruded the underneath of the gondola to create some more detail.
The basic overall shape of the gondola is now modelled. I can now begin to add more detail and then duplicate it to the back.


Now I can start modelling smaller details of the gondolas, starting with the windows. I did this by selecting the outer faces of the front and extruding them inwards.
The next adjustment I made was the supports on top of the gondola. I decided that it was better to have four total supports rather than two large ones. I adjusted them by using the knife tool to firstly create new edges in the supports and deleting the faces between them. I did the same thing for the support at the back

I then duplicated the front gondola to the back of the Zeppelin so I had two in total just like in my sketch.
The Zeppelin is essentially done and modelled now. The next phase to start making improvements and adjustments to the model. I may add or change some areas that would be different from my original sketch, however I will mention these alterations.

Maya - Extra Details/Refinements

In this stage I am now just refining my Zeppelin model and adding extra details. I have decided that I want to change my current elevator flaps and make them thinner.
I did this by selecting each individual flap and using the scale tool to make them thinner. I wanted to do this because it added more realism to my model.


I made the flaps a lot thinner compared to how they were originally when I modelled them.
Maya - Texturing Process
I did some research into the materials and designs for my Zeppelin before I started my texturing process. I want my Zeppelin to be black with a big Nazi symbol in the middle and two smaller nazi symbols on the top and bottom elevator flaps.


The selected region on my Zeppelin is the area in which the Nazi symbol will be. The unselected region is where the black metal texture will be.


I went Google to search for an image of the nazi flag that I will be using for my Zeppelin. I then applied the texture on the selected region of my Zeppplin that I wanted.

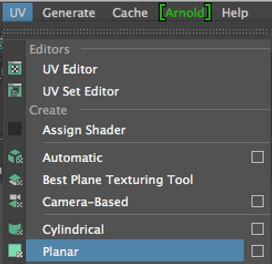
I used the UV planner to help adjust the texture so that the symbol was in the middle.


The Nazi symbol is now textured and can be seen on both sides.

Next I need to texture the remaining areas of my Zeppelin model. The selected region is where I will use a black metal-like texture for my model.


Before doing that I decided to create the smaller Nazi symbols on the elevator flaps. I created a plane and made it smaller in size.
I then used the same Nazi symbol to texture the plane and I adjusted its size.


I then moved it onto both sides of the top and bottom elevator flaps.

Recording & Filming - Analysis
I mentioned at the beginning of my project that I wanted to have my Zeppelin model implemented into a still image of a city skyline as a Maya composite. I have decided to alter this slightly by using an actual recording of the sky instead of an image. In this recording I will have my Zeppelin composited into the recording so that it look like it flying over in a real life recording of the sky. In addition I said that I wanted my Zeppelin to textured black but I have decided to leave it a grey material as it would match the recording better. I will have the final recording made in Adobe After Effects.
Star Wars - Opening Scene
On the left is a great example of how I want my final recording/composite to be like. This is the Star Wars opening scene where a giant airship is flying over a planet in space. It is simply a still recording of the planet in space and the airship flying over it. This is how I want my composite to be like. I will create a still recording of the sky and have the Zeppelin model from Maya composited and made to look like it is flying over.
Recording & Filming - Handheld/Tripod Clips
For the actual recording process I will have a handheld and tripod recording of the sky. The handheld recording will be when I am holding the camera freehand so that it looks natural and the tripod recording will be still so that it looks more focused. I will record both and try to include things such as the environment, wind blowing, airplanes flying over with sound and more. Ideally I would want to pick up the sound of any planes flying over so it can be used for the sound of my Zeppelin flying over instead in the composite.
Initial Problems
Initially when I was recording a handheld clip I thought that moving the camera around in the direction of how my Zeppelin would be flying would be a good idea. As seen in the video on the right I am moving the camera, this turned out to be a bad idea because it would be too difficult to have the camera and Zeppelin moving at the same time. If this was done I would have to track the Zeppelin along with the camera at the same time, and then animate the Zeppelin moving. This would prove too difficult to do so I will stick my my original idea with have the recording at a still view. Although this clip is a good representation of picking up the sounds and small details of the environment such as the airplane sounds and clouds moving in the sky.
Multiple Recordings & Angles
On the left is another recording from a street angle staring directly upwards towards the sky. I will be recording many clips from a variety of views and then later select the clip that I like the most. Some angles are better to film from than others so I will do this and then compare which recording suits my Zeppelin flying over in the sky.
Recordings/Primary Research
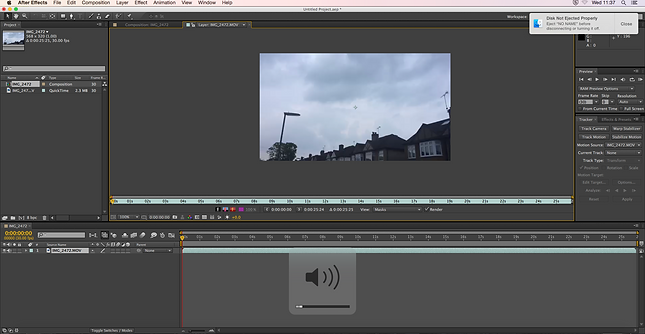
Below are four recordings from my neighbourhood that I took. I filmed various angles and views to experiment and I also managed to pick up the atmosphere as much as possible such as the clouds, trees and an airplane flying over in one of the clips. I will select the best one out of the four and use it for my composite.
Chosen Recording For Composite
The recording I have chosen out of the four that I filmed is the one on the right. I liked this one the most mainly because of the airplane in the background. Conveniently this happened while I was recording the clips. I mentioned earlier that I wanted to pick up such sounds so I could use it for my Zeppelin, also it creates a lot more atmosphere in the environment.
After Effects - Tracking
I will be using Adobe After Effects to help me create this final recording. The first thing I did was simply imported the short clip into After Effects ready for the tracking process.
By clicking on 'Track Motion' on the right a white square will appear overlaying the recording. I need to use this so I can track the Zeppelin with the film while it is moving across. So I put the tracker on top of a street light because it is visible throughout the the whole recording.


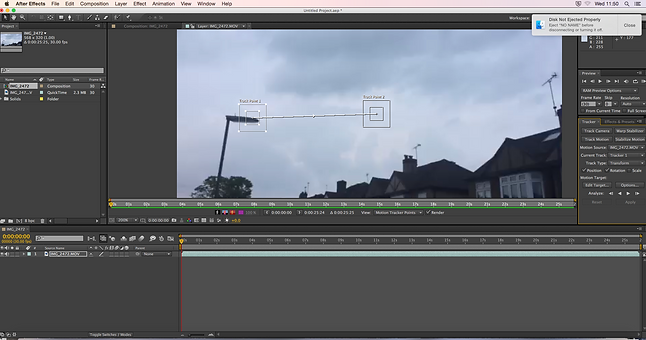
By clicking on 'Rotation' on the right side another tracker will appear.
I moved this second tracker on top of a chimney of a house, this will help with the movement of the Zeppelin flying through the sky.


The next thing to do is to create a 'Null Object'. This is an empty object that I will use to attach the flying Zeppelin with. Once this is done I selected 'Edit Target' and apply the this.
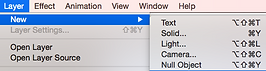

Once this is all applied a red square will appear on the screen to represent the tracking of the empty object.
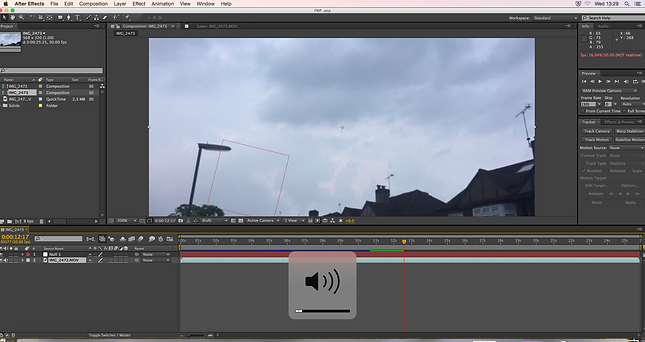
Maya - Zeppelin Animating

Next is to import an image of my video into Maya so I can animate the Zeppelin flying over.
Then I started the actual animating of the Zeppelin. By pressing 'S' you can set the key at the bottom of the timeline, this then allows you to start moving the object to your liking. I did this then set it to 1000 frames so the Zeppelin could fly over the houses at the appropriate speed.


On the left is perspective view of the flying over.
This a short clip of my Zeppelin composite in Maya. The final project will look somewhat like this.

The next step is to do a render sequence of the Zeppelin moving across the screen. Eventually I will go back and alter some things in Maya before rendering the actual animation to import into After Effects such as textures and viewpoints, all these can changed if wanted before actual rendering. The real render will take a while because it will be 1000 frames.
After Effects - Zeppelin Model Implementation
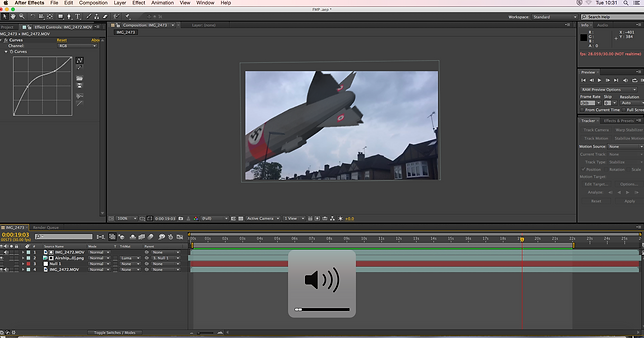
I imported the Zeppelin animation/model after rendering it in Maya. I then attached it to the null object as mentioned earlier this allowed the animation of the Zeppelin to be composited into the video clip. The tracking process that I did before also allows the Zeppelin to move along with camera, creating more natural movement.
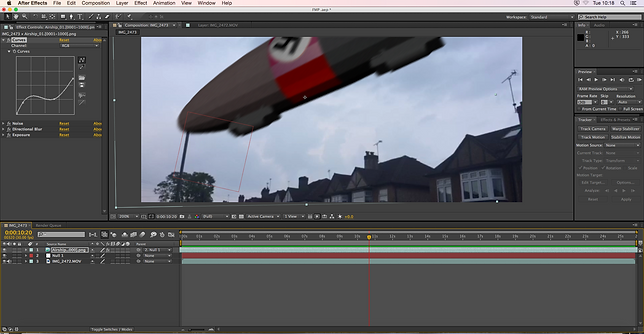
This a short video of the Zeppelin in After Effects. In the final project I will alter the colours, blur etc.
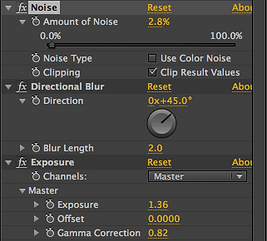
In this stage I can adjust the noise, directional blur and exposure settings for the Zeppelin. The aim is to match the colours of the video clip.


The next step is to cut out the street light and tree and put it in front the Zeppelin while its flying over. Below is the tree and street lamp I will need to cut out.

To do this I duplicated the image of the video clip and then put it above the Zeppelin model. Then I simply selected 'Luma' for the trackmat. This then allowed the tree and street light to be behind the Zeppelin while it was flying.
Storyboard
Below is a storyboard I created that shows the Zeppelin's movement at various stages of time.

Final Project
Project Evaluation
The theme of my project was the World War 1 Zeppelin, and airship used for warfare. The reason I picked this is because the Zeppelin has always been one of the biggest and most intimidating airships of all time. I though its life cycle was very interesting when researching it, there were man successes and failures during the course of its life.
The area of my project I enjoyed the most was definitely the research, because as mentioned earlier the Zeppelin's history has always been interesting to me. The research was a long process but I enjoyed finding out the Zeppelin's life cycle from start to finish and its influence on the modern world.
Some new techniques I experienced was definitely during the 3D modelling. I learnt man new tools within Maya to help my build my 3D Zeppelin. These include techniques to help me create more realism to the model.
The technique I would like to develop further would be After Effects, especially the tracking process to help implement 3D models into videos created in After Effects smoothly. After Effects was a new program to me that I had no previous experience with so learning more about it would help in the future.
The aspects of animation and games I researched throughout this project was the relation between my project and its real life influences such as the Zeppelin's affects on the modern world, like its implementation into games.
This influenced my project to the extent that I had to research what games included the Zeppelin and how it was used in those games.
The technique I enjoyed the most was animating the Zeppelin in Maya so it would transitioned into After Effects for the video. It was simple but I enjoyed looking for the perfect view when animating the Zeppelin.
The most successful part of my project was the creation of my 3D Zeppelin in Maya. I think it turned out very well and realistic.
I did encounter a problem during my project which was the texturing process. It was quite tedious to put the Nazi flag on the Zeppelin and looking for a texture for the surrounding body of the Zeppelin was also difficult.
This did not affect the project too much as I managed to create the perfect look for my Zeppelin in the end however it did take up time during the project.
If given the chance to complete the project again I would change my video that I recorded from a neighbourhood view to a city skyline view.
Final Evaluation
The aim of my project was to create a 3D representation of a World War 1 Zeppelin and composite it into a real life recording. The concept of my work was to re-create the WW1 Zeppelin and merge it with the present day. The context of my work is that the WW1 Zeppelin has always been one of the biggest and most intimidating airships for warfare throughout history even though it the production was discontinued after WW1. This interested me the most because it set the Zeppelin apart from the typical fighter jet used in modern times. I do feel that I have met my intentions with my project that I gave myself from the start. I feel that I have made my project even better from my original intentions. At the beginning I stated that I just wanted my Zeppelin composited into a still image of a city skyline. Now I have composited it into a real life recording using After Effects, and animated it to have it flying. In terms of the research and modelling the Zeppelin, I have met my intentions perfectly.
I feel that my research was very successful throughout my project. I managed to complete all areas of my Zeppelin research that I set out to do. I covered areas such as Zeppelin history and influence on the media, art and modern games. The most relevant research for my FMP was the research on the first Zeppelins. I enjoyed finding out for about this and how the Zeppelin was created. Also this helped with gaining a better understanding of how the design of the Zeppelin changed throughout history. This research inspired my project in the sense that it was the first bit of research I typed up for the Zeppelin. Learning about its history was important to help get a better understanding. Some of the most important and most relevant things I learned from completing my research were firstly the modelling research. In this I drew my own design of the Zeppelin and create some uniqueness to it. In addition, prior to this I had to do a structure analysis of the Zeppelin, which included researching the parts of the Zeppelin before sketching it and then modelling it in Maya. I relied on my subject knowledge to some extent in the sense that the modelling of the Zeppelin I referred back to my Maya skills from previous units, however using After Effects was new to me.
My idea developed throughout my project only on the sense that I changed the compositing process from a still image to a video recording. I changed this for the better. Most of the testing and experimentation I did was during the modelling of the Zeppelin in Maya. I used reference images to help me model the Zeppelin and during this I changed the main body of my Zeppelin so it would look more impressive. This was definitely inspired by the reference images and design changes of the Zeppelin throughout history I found in my research. Another area of experimentation during my project was in After Effects. I initially had to do a lot of adjustment with the way the Zeppelin was viewed in the recording; I had to ensure it was at an angle that matched the video clip. Experimenting and testing helped me with creating the best possible outcome for my project. One example would be the recordings I did, I recorded many clips around my neighbourhood to then eventually find the perfect clip. One problem I had during the recording stage was with only being able to record while my camera was still making the final video look less cinematic. However I realised that it would be easier to animate the Zeppelin in the video.
I decided how I was going to make my final outcome when I initially was thinking of my project idea. I wanted to model a Zeppelin in Maya and then addition to it made a composite of it so I could link something of the past in present day. The methods I used to produce my work was firstly researching the parts and structure of the Zeppelin and then being able to model in Maya with the information I learned. The next method after modelling the Zeppelin was After Effects with the compositing process. Answering my statement of intent with my chosen methods was quite easy as I was already familiar with most of my methods such as Maya however because I altered my project I ended up using an additional method, which was After Effects. All of my methods were successful and making my project with both Maya and After Effects worked out perfectly and did not encounter any issues with the software. The strengths of working with these programs is that I was already familiar with Maya so it was not an issue and After Effects allowed me to experience video editing which I was new too. One weakness of working with After Effects was that because it was a new experience and it took some time to learn the techniques. If I were re-working my project I would experiment with After Effects before the compositing process. The characteristics of my work would be 3D modelling, texturing, animating, compositing and video editing.
The audience for my project is more of the video and film-editing scene. Compositing the Zeppelin into a real life recording was an important step and 3D models being composited for movies are common. I expect my viewers to interact with my project would be viewing my video and comparing the real life environment to the 3D Zeppelin. I hope that my audience would learn that the Zeppelin was definitely one of the most terrifying airships of its time, reason being I composited it into a recording of a neighbourhood. My FMP does answer my original statement of intent however the only change would be the real life recording.
As a final body of my work I would say that my project was very successful. I managed to complete my initial intentions and create something better than my original idea. As mentioned earlier the only change that occurred during my project was the transition from the still image to the real life recording composite. I changed this because a video would have seemed more impressive. A classmate thought that recording my final video while holding the camera at the same time added to the realism. I feel that my final outcome turned out well.
When balancing the time management for my project I did most of the 3D modelling of the Zeppelin at home and then all After Effects work was done in college. I followed my timetable for the most part however I did feel that I was ahead of my schedule. At the beginning I followed my timetable well however after time I began to just work at my own pace.
If I could re-work any section I would re-do the texturing process and improve the Zeppelin textures. If I were given another ten weeks for my project I would improve the textures and make more recordings of my Zeppelin from different angles with other backgrounds.