
Unit 13 - Final Major Project
Statement Of Intent
Section 1: Review (Approx 200 words)
Explain the journey you have gone through in this past academic year - perhaps through the previous year as well. What were the greatest milestones of your learning? How do you feel you have developed as an artist? Explain how you have decided on your specialism – was it a turning point in a specific project? Have you always identified as a specific type of artist? If so, how have you developed and furthered your skills to get to this point? Explain how your journey has ended up here, with this idea, for this final major project.
When starting the second year of this course in September 2017, I experienced a variety of different skills that I did not learn about initially during the first year. Throughout the units I learnt about green screen compositing, interactive Flash animations, character rigging and more. Although I found the character rigging in Unit 12 part 2 and the James Bond title sequence somewhat challenging, I still managed to complete them. My greatest milestone of this year was completing the entirety of Unit 10 because I found that this unit was very long as it consisted of three different projects which required new skills of mine. However, I managed to complete this unit successfully while creating a critical approach to each of the projects for my website page. I especially feel as if I enhanced my skills in animating in Maya, I discovered this during the mech rigging section of the unit. Overall, from all the unit during this year I found that I really enjoyed Unit 12 part 1 where I had to create a game demo. I specifically enjoyed the modelling 3D assets in Maya so they could be exported in Unity. From further developing my animating skills in Maya and also continuing my keen interest in 3D asset creation I have decided to create a 3D model of a WW1 armoured train and then animate it into a battle scene where the train is moving around whilst firing at enemy vehicles.
Section 2: Project Concept & Proposed Artist Statement (Approx 300 words)
This is where you explain your FMP project idea and concept. Be specific about what you intend to communicate and what you hope to achieve by producing this work. How will your work engage or affect your audience and what will they discover by interacting with or viewing your work? Describe the theme/concept of your work – is it based on fact or fiction? Are you creating or reacting to a mood, an emotion, a sense of atmosphere or sensation? What is the title of your Project? What will you work towards producing? What will be your final outcome?
For my final major project, I intend to create a 3D model of a World War 1 Armoured Train, I will then implement the train into an animated battle scene. During this scene the train will be coming in and moving around on the tracks whilst shooting at enemy vehicles like planes and trucks. I’ve done brief research into the history of the armoured trains already and its impact on war. Armoured Trains for war were mostly used during the 19th and 20th century. They allowed large numbers of firepower to be moved quickly while staying in the same place. These trains included mostly railroad cars with artillery and high powered machine guns. During WW1 the armoured train was best used by the British Royal Navy when supporting the British Expeditionary Force whilst fighting in Belgium in the First Battle of Ypres (1914). Austria-Hungary also used armoured trains whilst defending themselves against the Italians during WW1. In my final animated sequence, I intend to convey that a war is going on and this battle scene involving the armoured train will illustrate action and bloodshed to the audience. During the short animation the train will be coming into the scene and will begin firing at all the surrounding vehicles, while the other vehicles will also be attacking the train itself. I want to have the scene set within a desert environment similar to the Middle Eastern theatre of WW1 (1914) where the British fought against the Ottoman Empire with support by the Germans. So the surrounding environment will give the audience a brief reminder of this period during the WW1. The camera view in the animation will give good perspectives of the scenes with close ups of the train moving and firing and also other vehicles trying to attack it.
Audience? What mood do you intend to convey?
Section 3: Methods (Approx 150 words)
Refer to any techniques and processes you intend to use. Describe the range of media and materials relevant to your project and how you may use them to explore and develop your ideas. Include aspects of studio practice, workshop procedures or the use of particular equipment and software etc. In the timetable, provide an indicative timescale for your project and indicate the manner in which you intend to divide your time in order to investigate, develop, produce and evaluate your project appropriately. This should be a meaningful plan to you and should be personalised to your project.
Some of the techniques and processes I will use is firstly the 3D software package Maya. I will use Maya to model the WW1 armoured train and also the additional vehicles such as trucks. Maya will also be used to animate the battle scene after the modelling process. I intend to use Photoshop and Substance Painter to create and edit textures to apply to the 3D models in Maya, with some pre-existing textures from online sources/texture libraries. Next, Adobe After Effects to composite the rendered images from Maya. As for research methods, primary will be from Imperial war museum, secondary research from the Internet to type up a detailed approach of the WW1 armoured train’s history and its use in modern media. I want to also mention forms of media that the armoured train is involved in such as video games like Battlefield 1 and paintings such Gino Severini’s ‘Armoured Train in Action’ in 1915. In terms of preparation of making my 3D armoured train I will initially draw concept art of these trains until I come to a final drawing of how I want to my own armoured train to look like when modelling. Only after this will I began modelling it in Maya. For the animated sequence I will create a story board of how I want to my animation to look like form start to finish then will began animating it in Maya. I will use many resources such as images and videos to create a good understanding of how I want my animated sequence to look like.
Section 4: Evaluation (Approx 150 words)
How will you critically review and analyse your work and determine if it is successful? How will you identify directions for ongoing development? Do you have a method to record the critical response to your ideas? How do you propose to assess the success of your Final Major Project and what will be your methods of evaluation?
I will review my work at the end by initially making a comparison to section 1 of the statement of intent to see if the original idea and the final result are aligned or whether any changes were made. Then I will compare the final outcome to my section 3 of the statement of intent and see if the methods I used throughout were different or not. At the very end of my FMP page I will type up a short project evaluation briefly discussing how I feel I progressed throughout the unit and then after I will type a longer evaluation following the guidelines more and exploring in more detail. In addition, I want to allow my peers to view the final outcome and have them comment on what they like about it. I will also include my own personal comment on their opinion of my project. I may also compare my final 3D model of the armoured train to actual ones in order to compare historical accuracy, however I intend to design my armoured train to my own style and design.
Audience/peer review
Proposed Research Sources and Bibliography (Harvard Format)
What are the influences, starting points and contextual references and why are they relevant to your ideas? Indicate the subject areas you intend to research and the likely sources of information including any museums, specific locations, performances, etc you plan to visit. You should explain the value of this research and then compile an accurate bibliography correctly acknowledging all references including texts, periodicals, websites and video/DVD’s etc
I want to use a variety of history websites which document the life of the armoured train. In addition, I will research forms of historic or modern media which explore the trains such as video games, new articles, paintings, stamps and more.
Areas of research-
First Battle of Ypres (1914), Battle of the First World War, fought around Ypres, in Belgium.
Middle Eastern theatre of World War 1 (1914), A series of military campaigns fought in the Middle East.
Tanks and trains
Artwork representing warfare.
Film- Storyboarding action, filming vehicles, editing, lighting of action sequences in fim.
REFERENCE
WEB
BOOKS
MEDIA
Gino Severini (1915), Artist who painted the ‘Armoured Train in Action’ painting.
Battlefield 1 (2016), First-person shooter video game set in World War 1
Project Idea/Concept & Unit Aim
This Unit will require you to make use of skills, knowledge and understanding developed in previous units to complete and art and design project. This unit will also provide an opportunity to explore in greater depth an art and design activity your own choice. It will develop and extend subject knowledge, realising creative potential though personal research, experimentation and communication of ideas.

Project Idea: For my FMP I will make my own 3D model of an armoured train from WW1 and also create models of other vehicles such as simple battle trucks and planes. I will then create an short animated sequence of a battle scene with the train moving and firing at the other vehicles whilst these enemy vehicles are firing at the train. I the environment will be of a desert just like when the British were fighting the Ottoman Empire in 1914.
In this section I will discuss and list all the other sections that will be included within in project. I will have a brief overview of each section and talk about what the section is about.
The first section after this will be the analysis of the project idea, in this short section I will briefly go over I will need do specifically for each area of my project from the modelling to the final animation.
The next section will be the requirements/parameters. This will include mainly what resources I will need to make my project such as software. It will also discuss possible risks and what I will do to overcome these issues.
Underneath that will be my time management plan, this will be showing my timetable of all the project work I will need to do over the next 10 weeks. I may not follow this exactly as I may be ahead of it or behind it however I will include this just to show what areas need to be worked on.
Next is the beginning of the research which will be the research on the history and development of armoured trains. This will include an overview of the first armoured trains to be developed and how they improved during warfare overtime.
After will be the research on the media influence/various other sources. In this section I will discuss where the armoured train has appeared in other forms such as newspaper articles, artwork, posters, video games etc.
The next bit of research will be the research on modern day uses. This section will be about where the armoured train has appeared in modern times and what they're uses are.
The last bit of research will be on the research of how the armoured trains ended. This last research section will be about how the armoured trains stopped being used in warfare and what contributed to it.
Next is the modelling analysis this is where the modelling will begin and I will discuss how I want my armoured train to be modelled in Maya.
Following that will be the structure analysis which will be about what specific areas need to be modelled and what is of most importance.
Then after comes the concept art. This section will include all drawings and creations I have made whilst doing actual real life drawing. It will mainly include perspective drawing and experimental work.
After this will be my final design, which will have my final sketch of what I want my own armoured train to look like once it has been modelled entirely.
Finally comes the actual modelling in Maya. This section will be called - Maya basic shape modelling. It will quite a long section as I will provide screenshots of all the modelling of the train.
After finishing the modelling I will have a modelling evaluation which include a short review of my 3D train model and what I can do to make it better.
After the evaluation I will include a refinements/extra details section which will focus on the improvements that need to be made form the modelling evaluation. I will then do these improvements in Maya and document them.
Next comes the texturing process which will document how I will texture my train most likely in substance painter.
Then comes the modelling of enemy vehicles which will show screenshots of how I create basic and simple vehicles like planes and battle trucks.
Right after will be the texturing of enemy vehicles in substance painter.
Following that comes the Unity environment creation which will initially document my own research of the type of desert scene I want to create. I will then show the process of making the environment in Unity.
Then the next section will be my storyboard showcasing what I want my animated sequence to look like on paper.
After that will be another large section which is the Maya animated sequence process. This will show the entire process animating my sequence. I may also so some experimental previews.
Next will be the After Effects section which will show the animated sequence from Maya being exported and rendered in After Effects where I can also edit the brightness and colours.
Right after will be my final render of my animated sequence. Essentially my final project which will be 100% done.
Finally comes the project evaluation which I will review the entire project following the guidelines of the sheet. I will also include peer feedback from classmates.
Analysis Of Project Idea

This section discusses how I will make my project excluding the research and concept art. Once I have created a final sketch of what I want my armoured train to look like I will begin modelling it in Maya, I intend to begin modelling the basic shape and go from there. After this I will adjust it slightly and make minor improvements. I shall then use substance painter to texture my train as realistic as possible to WW1. Then I will begin modelling planes and trucks from WW1 in Maya in a basic form and then texture them again in substance painter. After I will use Unity to create a desert type environment for my animated scene. Then I intend to use Maya to begin animating the sequence. Next I will then use After Effects to render the final animation.


Requirements/Parameters
In this section I discuss what I will need to create my project such as software and other resources I can use and refer to.
Concept Art
For the concept art and final design sections of my project I will use other concept art already created to help me with my own concept art.


Autodesk Maya
Maya will play a very big part in my project and is an essential program to help me make this project I will use Maya to model my train and animate my scene.

Substance Painter
I will use substance painter only for texturing my armoured train and other vehicles.


Unity
I shall use Unity to only create the desert environment for my animated scene.

After Effects
I intend to use After Effects to render my animation from Maya and use it to edit the brightness, contrast, colour etc.


Time Management Plan
Below is my timetable for the next 10 weeks, it documents what I will be doing for each week. However I may not follow it entirely.


Research - History & Development Of Armoured Trains

Origin & First Uses
I will first talk about the origin of the armoured trains and when they were first used. Although I will be using a WW1 armoured train for my project. I intend to initially talk about their original development throughout history. Below I have researched wars during history before WW1 that used armoured trains.
The armoured trains were mainly used to project workers or defend key areas of battle, because its very stationary position this is what the armoured trains were best used for during war.
The First Armoured Trains
American Civil War (1861)
One of the first seen uses of the armoured train was during the American Civil War. The image on the right side is the 'Railroad Battery' train which was used in order to protect workers during the war. This train was successful in its purpose as protection however it was quite vulnerable to artillery and enemy snipers discouraged the workers from repairing the train's damage while on the move. In addition the train allowed the Confederates to transport troops and supplies whilst providing firepower. However because the train was filled with troops and supplies it made the train a target to the opposing force.


Second Boer War (1889)
Another time the armoured train was used was during the Second Boer War. The image on left was when the train was used in South Africa by the British. It was filled with volunteer infantry troops and mounted with a machine gun. However it did not prove to be very successful as it ended up being ambushed and derailed during battle. Many soldiers were captured as a result.
Russian Revolution (1917)
One of the most famous armoured trains was the Russian Zaamurets. The Zaamurets was actually involved in many different battles and its full history is not know fully. The train was used by countries like Russia, Ukraine and even as far as China. The Zaamurets had two gun turrets, eight machine guns, three - four inches of armoured protection and powerful motors that could allow the train to travel at very fast speed. It was considered the king of mechanical beasts. It even ended up in the hands of the Chinese who used it against the warlords for territorial dispute. Eventually the Japanese got hold of it and happened to it after remains a mystery.
References:

Strategies & Tactics In Warfare

Ukraine's Train War
The Zaamurets train was actually constructed but the Ukrainians in Odessa in 1916. During the following winter and spring, it served as mobile anti-air platform on the Galician Front, where Russia fought the Austro-Hungarian Empire. They used the train to mainly take down aircraft as it had powerful turrets to do so. The turrets on the train could rotate easily so it didn't prove difficult to take down plane with it during battle.
The Polish Campaign
The Polish used trains during WW2 against the invading Germans and acted as a defence strategy. However the Germans also used armoured trains but attached powerful cannons in order to have a devastating effect on the enemy.


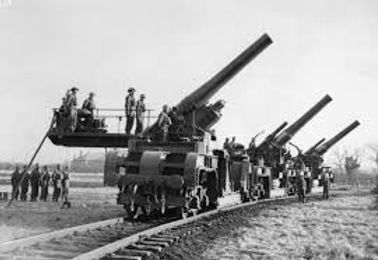
Schwerer Gustav
The German's also went as far as developing a super cannon called the Schwerer Gustav. As seen in the image it was a massive canon that also travelled on rails. It was created in 1941 during WW2 and had devastating effect on Sevastopol, firing 300 shots into the city causing major damage. It advantages were that it could fire shots from very far away and each shot could cause much damage on the target. However it had drawbacks as well, because it was very expensive and it was vulnerable to Allied aircraft.
References:
https://www.warhistoryonline.com/world-war-ii/check-incredible-armored-trains-wwi-wwii.html/2
Roles & Equipment For Armoured Trains
Artillery/Railway Guns
This was a mixture of powerful weapons like machine guns and rocket launchers. These were used mainly for taking out large areas or multiple targets. Some were also equipped with small rail gun which were large cannons are seen on the left and could fire destructive shots at long distance.
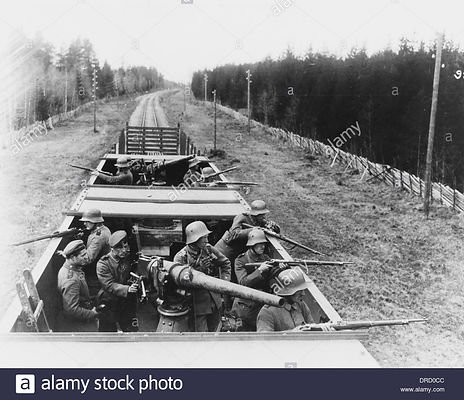
Infantry Car
Another key role of the armoured trains was the infantry. This was essentially a carriage dedicated to just infantry troops. On the right image some also have mounted machine gun turrets. Not too many of these cars were placed on armoured trains as other more stationary weapons proved more effective and having large numbers of troops of the train proved vulnerable to the enemy. These troops would still provide support for incoming enemy soldiers trying to attack the train in large quantities.
These artillery weapons were exactly like the artillery weapons that were used by infantry soldiers however these ones on armoured train were more stationary and as seen on the image on the left side they could only be fired on the side that they were pointing at. They could still be moved up and down though. They were essentially large cannons that could penetrate fortifications and small vehicles.
Below I have researched all the platforms and separate roles of the armoured train. This section is important in order for me to fully understand what will be on my own armoured train when I begin the modelling later on.
Anti-Aircraft
Another role of the armoured train is anti-aircraft. This was quite an important role for the train has it was very vulnerable to the aircraft. However these were equipped with anti-aircraft weapons. Similar to the artillery weapons these cannons were stationary on the car, however they could rotate all the way around as opposed to the artillery which could only go up and down to fire. It was important for the operators of this car to maneuver the weapon quickly whilst firing at enemy aircraft flying at high speeds in the air.
Command & Control
The command and control was essentially the train's command centre where all the important instructions were given. The commander would be in this area giving orders. This part of the train may be in the front or middle of the entire train. In this picture the command and control centre is at the front of the train. Although vulnerable to frontal attacks this part of the train oversees the entire battle and what's coming ahead of it so that the more powerful cars could take them out quickly.


Anti-Tank
These were weapons for specifically taking out enemy tanks. They are equipped with anti-tank weapons, usually a tank gun turret. These were as important as the anti-aircraft cannons as powerful enemy tanks could derail the train if not careful. There cannons could rotate all the way around so that they could take out tanks in any direction.
Troop Sleepers
There was another railroad car that were for troops being transported over night for a long distance. During battle these cars would not be equipped onto the armoured train as it proved counter-intuitive. Usually these were placed on 'armed' trains during times of peace like night time. In terms of transporting soldiers this proved effective as large numbers of troops could transported at once.

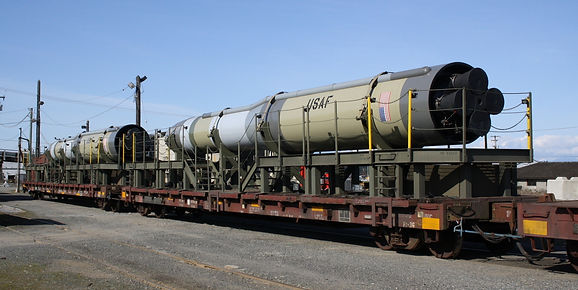
Missile Tranport
Having platforms for transporting missiles was also important and is also still in active use today as seen on the left side. Again these platforms would be not used during times of battle as it would be too vulnerable. Transporting missiles via train was very effective as many could be moved at a time
References:
https://en.wikipedia.org/wiki/Armoured_train#Design_and_equipment
Drawbacks & Crashes

Below I have researched some disasters that happened with the armoured train. The armoured trains had disadvantages just like other technologies used during warfare. I have researched the ones that appealed to me the most.
NR13 Bombed And Derailed
On the right side is an image of the Polish armoured train, NR13. It was one of the most famous Polish war trains at the time, however it was bombed by German aircraft during WW2. Hitler himself actually examined the train and the German eventually used it for themselves in the war.

NR12 Destroyed By Crew
Another Polish armoured train that was destroyed in battle. However this train was destroyed by the crew members as it was unable to move and travel any further. During battle it was unable to withdraw from Warsaw and them crew members decided to abandon it and fight on foot.
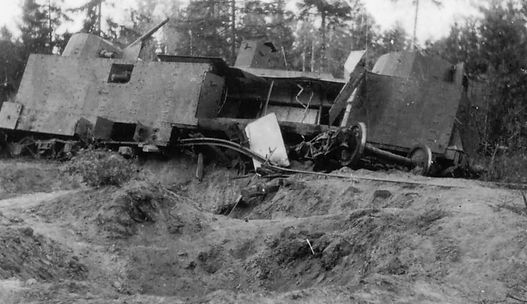
Panzerzug Destroyed By Mines
On the right is the Panzerzug armoured train built by the Russians during WW2. It was eventually destroyed by land mines planted by the Germans as seen in the image. The image shows the train derailed and the tracks destroyed. As the train was dependant on its tracks in order to move, the tracks itself were a vulnerable spot for the enemies. The mines were also a very deadly way of destroying armoured trains aside from aircraft. Mines could be placed on the tracks by the enemy even before the train reaches that point, by the time a crew member realises a mine was placed on the track it would have been too late. In addition it would have been hard to destroy the mine once it was detected and the train may have to remain stationary before it could travel any further in order to allow the crew to destroy the mine.
References:
https://en.wikipedia.org/wiki/Pozna%C5%84czyk_(armoured_train)

Aircraft was very deadly against the armoured trains as trains weren't as fast as the planes, therefore the anti-aircraft weapons couldn't keep up with the speed of the planes attacking them. If the train wasn't fast enough it could also easily be destroyed by bombs from planes, as the train had to stay on the tracks therefore limiting its ability to avoid the bombs.
If the train broke down and/or there was a problem with the tracks then the armoured train pretty much became useless to the crew. In this case the crew left the train and decided to fight on foot.
Research - Media Influence & References
In this section I have research where the armoured train has been found outside of warfare such as games, art etc. Below I have included some examples which I thought were the most interesting to me.
Artwork & Paintings
I start off this section with artwork of the armoured train I have found from the Internet. I included the ones that I liked the most and what I think is good about them. Some are depictions of the armoured train in action and some more passive paintings showing the train's structure.
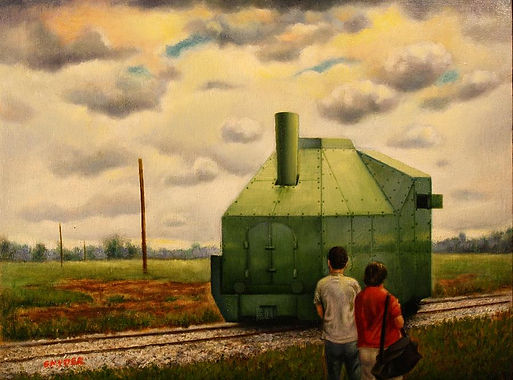
Waiting For The Armoured Train
On the left is an oil painting from Todd Snyder of a small armoured train passing some bystanders during WW1. I like this painting because of the small armoured train in the scene. I like its small structure and its simple design. I will use the train in this artwork as inspiration for my armoured train when modelling. This painting doesn't show the armoured train in battle of its ability in warfare, however showing its simple design and features.
Armored Train in Action
The next piece of artwork is from Gino Severini and was painted in 1915. Severini was fascinated with WW1 because he saw it as the first war with more advanced technology. Severini wanted to enlist for the military but due to poor health he wasn't able to. However had a view of the station in Paris and was able to see the armoured train being prepared to leave. He saw it being loaded with supplies, soldiers and weapons. Hence he had inspiration to paint this artwork. I like this painting because it is rather colourful and shows a top view of the troops fighting on the armoured train.
References:


Armoured Train Postcards


Armoured trains were quite popular in postcards at the time most of them illustrating there design and them in action against enemies. The postcard on the bottom left side shows an older version of armoured train hence the soldiers fighting on horseback. The bottom right image is a postcard of a Austro-Hungarian train attacked the soldiers in front of it. On the left is an image of an armoured train used by the German military, travelling whilst two soldiers are shooting it.
References:

Video Game References
The armoured train actually appears in many recent video games, mainly ones based on WW1 or WW2. I wanted to include these to show how the train to illustrated in modern day games.

Battlefield 1 (2016)
One of the most famous inclusions of the armoured train is in Battlefield 1. The train in this game is based on the Zaamurets armoured train as mentioned earlier. In game the train has many turrets and machine guns to take out enemy aircraft. The powerful turrets make it easier it do this as they mobile and can rotate. In the game the train can been used on many maps with desert, snow and forest type environments.
Call Of Duty WW2 (2017)
Another famous addition of the armoured train is seen in COD WW2. On the right I have included an image from the campaign where the train can been seen. In the game the train is based on the Panzerzug train from WW2. This is train was armed with railroad card, artillery and machine guns.


The Saboteur (2009)
The next game involving armoured trains is The Saboteur (2009). The image on the left is actually some concept art of the train in the game. The game is set in Nazi occupied France and has a Nazi propaganda theme. As seen in the image the train is quite a simple design which I like because it won't be hard to replicate in my own design of it. I intend to create the railroad car similar to the designs in this game as they aren't as difficult to model.
Men Of War: Assault Squad 2
The fourth game I will be discussing will be Men Of War. The armoured train in this game is actually a mod for the game but I still wanted to include it for inspiration. As mentioned earlier the Polish used armoured trains extensively during battle. This train here is based off those Polish designs.


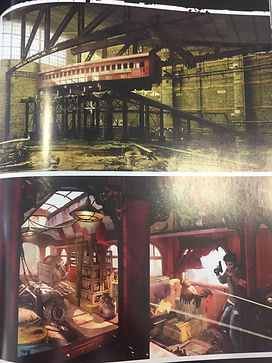
Uncharted 2: Among Thieves
The next game involving armoured trains is Uncharted 2. The images are from the official art book. Obviously these trains are more modern and fantasy looking. Though I may not take too much inspiration from the train in this game its nice to see these trains with more colour and vibrancy. Later on in the concept art section I will include more photos from the book detailing more about the train and its designs.
References:
http://battlefield.wikia.com/wiki/Armored_Train
http://callofduty.wikia.com/wiki/Panzerzug
The Art Of Uncharted 2: Among Thieves (Book) Edited By Daniel Wade


Movie References
Below are some films that feature armoured trains in action. I have researched the ones I liked the most with scenes of where the train in being show in battle setting.
Dark Of Sun (1968)
The first movie I found was Dark Of Sun. The film is about a solider who is trapped on a dangerous mission in Congo. His mission is protect the train he is on which holds valuable supplies trying to sneak into rebel controlled areas. In the short clip on the right side shows the train traveling until an enemy airplane appears and begins attacking. To me this illustrates one of the weaknesses of the armoured train which would be the deadliest of aircraft.
James Bond: Golden Eye (1995)
The next film is the James Bond Golden Eye film from 1995. In the scene it shows one of strengths of the armoured train where it gets shot by a tank on the track but the train still manages to ram into the tank and destroying it as a result. The train still blows up in the end however I think that this demonstrates the strong, thick armour of the train as it get shot by tank but can still withhold the damage. Also the train's ability to completely destroy the tank with its strength from just travelling at a fast speed is also note worthy.
Red Tails (2012)
The third film is Red Tails from 2012. The movie is about 13 black cadets that were part of an experimental program during WW2. These cadets throughout the film are trying to prove their worth as soldiers despite discrimination. In the short scene the train is travelling with infantry troops and artillery fire. I think it again demonstrates the train's vulnerability against aircraft as the airplane manages to blow it up.
References:
https://en.wikipedia.org/wiki/Dark_of_the_Sun
Research - Modern Day Use Of Armoured Trains
In this section I intend to briefly discuss the modern day uses of armoured trains. For the most part armoured trains have been discontinued in modern day military service. However I found some appearances of them.
Armoured Train Drills In Russia
The first and most recent appearance of the armoured train was in 2016 in Russia. In August 2016, Russia was trying to enhance its military forces by adding new weapons systems including the armoured train. This is Russia's attempt at weaponizing the rails. However even though these trains are back in service in Russia they haven't been upgraded with any new weapons or features. These trains can carry tank, APCs, armoured cars whilst having platforms for anti-aircraft weapons and artillery. Troops being placed on the train is also a standard feature.
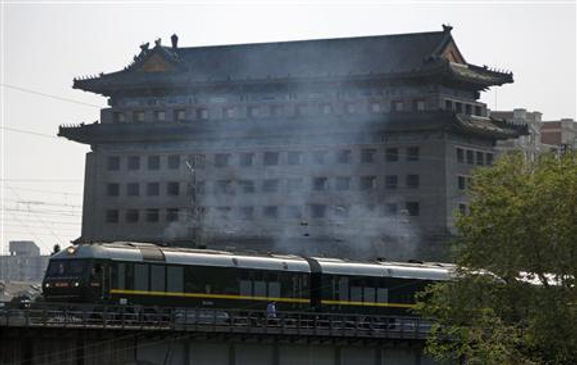
North Korean 'Armed Train'
Another use of these trains are in North Korea where they are currently active in use. However these trains in North Korea are the same type of armoured trains that have been discussed in this project, these are just normal trains for transport with protective armour hence the name 'armed train'. They were give as a gift to North Korea from the Soviet Union and prove to be quick and efficient whilst maintaining high security.
References:
http://www.thedrive.com/the-war-zone/4881/russia-has-revived-its-armored-trains
https://en.wikipedia.org/wiki/North_Korean_leaders%27_trains
Research - The 'End' Of Armoured Trains
In the last research section I discuss how the use of military armoured trains ended and why. Although armoured trains and armed trains are technically still in somewhat active use as mentioned prior, for the most part armoured trains have been discontinued in military use in majority of countries. Below I explain further.

Armoured Cars
One of the main reasons countries stopped using armoured trains was because of the invention of armoured cars, which are still in very active military use around the world. Cars are more mobile and flexible than trains. The armoured trains had to stay on its tracks therefore limiting its mobility a lot, however armoured cars go drive anywhere. In addition the armoured cars were smaller to produce as opposed to the armoured train which had to built along with all its cars and platforms.
Aircraft
Aircraft was one of the biggest reasons to why armoured trains were so vulnerable. Train were very stationary and when they were firing they were even more vulnerable to attacks. This gave aircraft a chance to attack it from above. One reason aircraft was so deadly against the armoured trains was because aircraft could bomb or shoot the trains and fly away quickly without being noticed very much. Another reason was because train couldn't travel near as fast as aircraft, this gave them a chance to destroy the tracks even before the train reaches its destination.

Vulnerability Of The Tracks
Aside from air attacks, the tracks also proved to be too vulnerable. The first reason was because the train could only travel on tracks therefore limiting its mobility. Secondly the tracks could very easily be destroyed in advanced by explosions, in addition land mine could be set on the tracks.
References:
Research - Final Conclusion & Extra Resource(s)
I have come to the end of my research. I used many references and websites from the Internet to help me with my research of armoured trains. Below I have two videos from YouTube that I used to help me most with my understanding of armoured trains.
Conclusion
In conclusion I think that armoured trains were to being with a powerful and innovative piece of technology that had somewhat good success during warfare in WW1. They proved helpful when providing extra support and were also a useful alternative for tanks and cars in WW1. However despite the innovation it also proved to be very vulnerable most of the time against aircraft and its tracks didn't help either. Armoured trains for warfare were an interesting spin on the typical train used for transport and proved there effectiveness in WW1, in contempt of there discontinuation. I gained a lot knowledge from the video on the left side.
Moving Forward
Now that all the research has been done I will now move onto the focusing on the construction of the armoured train in Maya. Before that however I will be doing some analysis of how I will model it to begin with, then I will have some concept art uploaded of the armoured train. Until finally I have drawn up my final sketch of my own armoured train and will begin the modelling process in Maya and creating the best 3d representation of it.
Modelling Analysis - Construction Process

Now I shall begin my modelling research section. In the part I will discuss what areas of my armoured train I want to model. Using the research from earlier I will refer to what cars/platforms I want to use and which train form history I will get inspiration from.
On the left side is an image of some Naval armoured trains. The three trains on the left side have artillery cars, troop sleepers, anti-tank cars and anti-aircraft cars as well as the command and control car. I want my own armoured train to include the command and control car, artillery car, anti-tank car, anti-aircraft car and infantry car all in that order. That will be a total of four different platforms that will be connected to each other.
Platforms
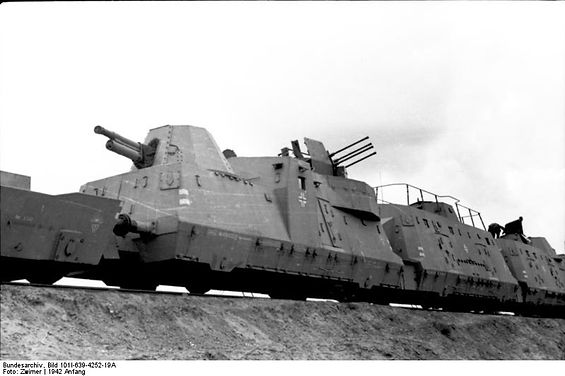
Zaamurets Train
On the right side is the Zaamurets armoured train has previously discussed in the research. I want to model my train based off of this one however with some alterations. As seen in the picture, the first two cars are anti-tank cars, the one behind it is the command and control car and behind that looks like some small artillery or infantry. The main focus will be ensuring that each platform looks distinct from each other as I intend to re-create each separate car with the most detail and realism as possible.

Modelling Analysis - The Structure

Basic Form & Texture
The Zaamurets train from the outside has a very boxy like design to it. It is mostly filled with straight edges and dome like structures as the turrets. I like this type of basic composition as it won't be too difficult for me to implement such architecture into my own design. I intend to texture my train with a dirty, scratched steel material and may also apply some slogans onto it as well as seen on the left image. I want the wheels to be hidden underneath the edge of the train so that when I animate it the train will look like its slowly hovering over the tracks. Therefore giving the illusion of it moving along the tracks.
Colours & Materials
Like the image on the right side I want the overall colour of the train to be grey whilst giving a scorched impression to it. However I intend to create a more dark grey texture for my train. As for the small numbers and symbols, I won't put too many of these as I think it may distort the look of my train but I will include some at the front and side of the train.

Concept Art - Initial Drawings

Below are some initial concept art drawings I create earlier. They are mainly my interpretations of armoured trains and how I would like my own train look like when modelled.

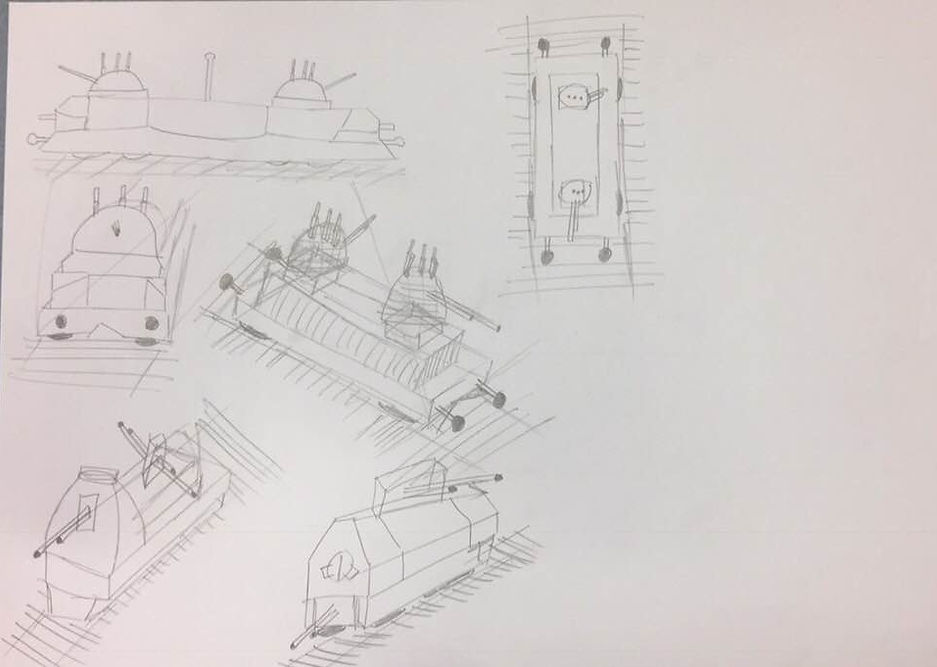
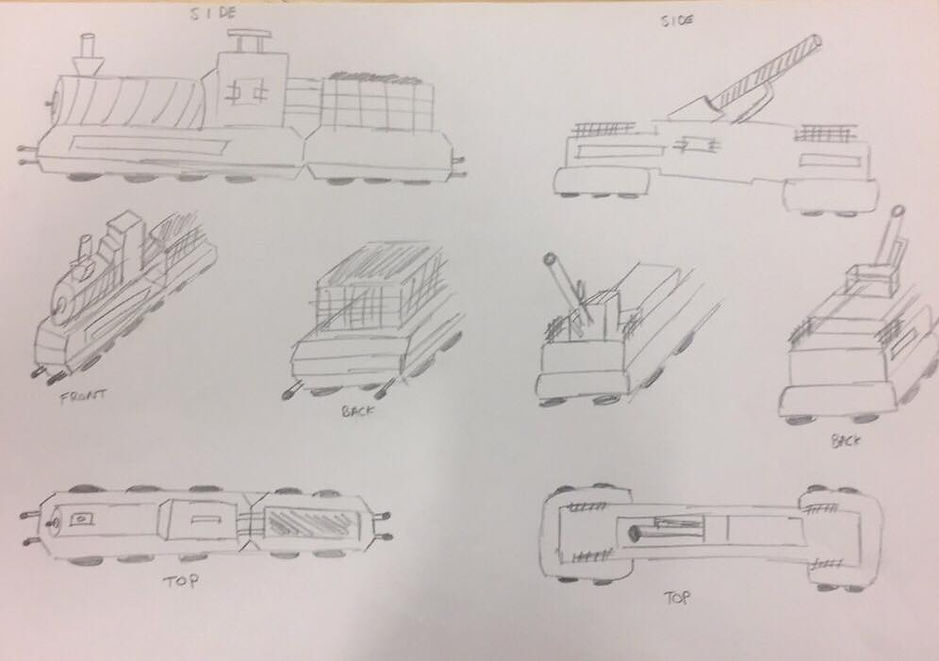
Concept Art - Perspective Drawings
I have now began to draw more designs of my own from inspiration from the Internet. Below I have drawn multiple views of the armoured train platforms. I have drawn some anti-aircraft/tank cars, command and control cars, artillery and more.


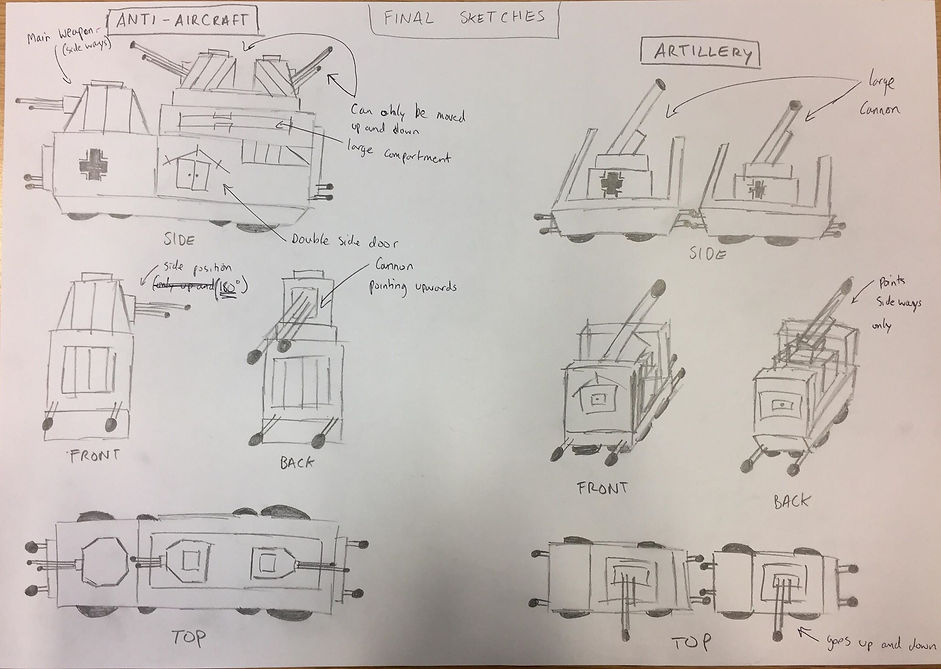
Final Design - All Train Platform Sketches
In this section I have all my design sketches for all the train cars I will be modelling from. These are all my own designs and I will used them to help my model them in Maya later on. I begin by drawing each separate carrage of my train.


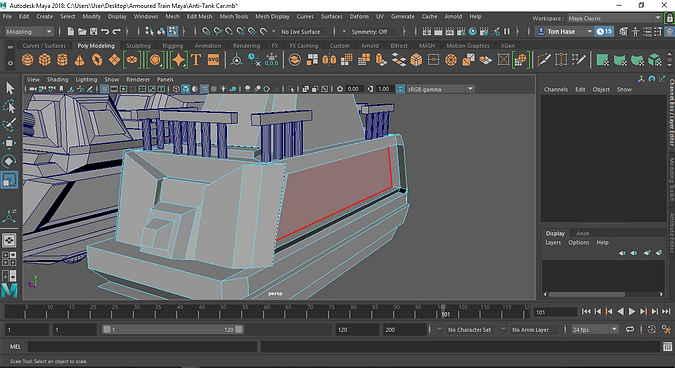
Maya - Anti-Tank Modelling
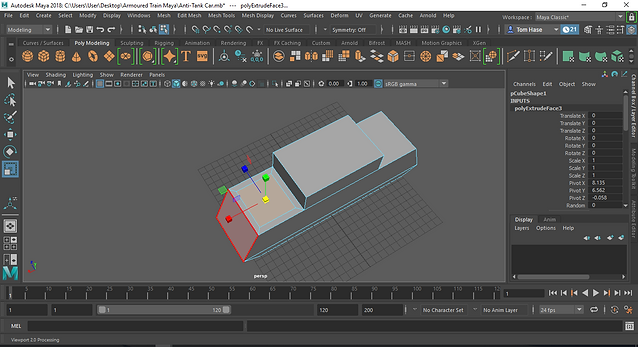
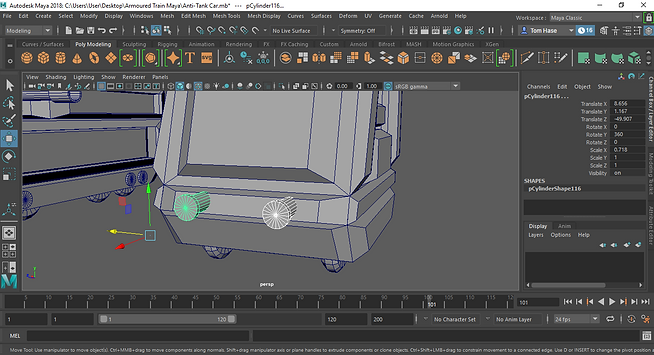
I began the modelling by first starting off with the Anti-Tank car as that will be the first carriage of the train. I model out the basic shape of of it and on the left side I am extruding the face whilst scaling it, this will allow me to later raise the face so that the cannon is thinner/smaller than the platform it rests on.
Next I raised up the extruded regions and further extruded that. I did this for both sides of the car and they will be the platforms for the cannons later on. As seen in the image on the right side I also selected the edge of the face so that I could create the leaned back look of the structure. I did this by first creating two extrusions from the initial region so that the top could be tilted whilst the bottom remains rectangular.

Then I created another extrusion in the centre and lifted up the mesh. This part was for the cannon in the middle of the carriage. I also tilted back the front area.
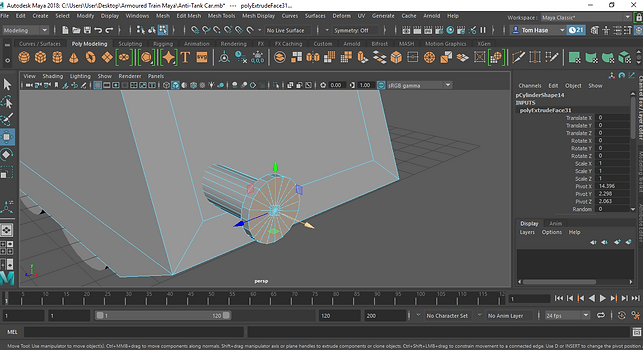
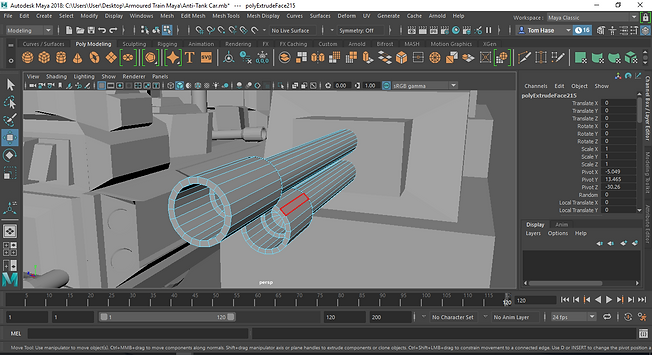
The next step was to model the actual cannons of the of anti-tank car. I firstly created a cylinder and extended it to my liking. After placing it in the appropriate region (front, back and middle) I adjusted the lengths.


After I extruded the end of the cylinder so I could create a barrel shape for the cannon. Then I simply extruded again so that I could move the mesh inwards, therefore creating a hole in the centre.
I repeated this process of the barrel underneath the top one. However this was the shorter cannon.


Then I duplicated the cannons for the back by using the mirror tool, which allows the mesh to be automatically duplicated at whichever angle is being viewed. I also duplicated the smaller cannon for the middle platform.
The next stage is creating the train buffer for the carriage. This is a smaller detail but will allow the other carriages to connect behind. I modelled this by scaling a small cylinder and putting it at the front of the carriage.

I then did a similar process as before as I extruded the end of the cylinder so that I had a larger circle sticking outwards.
After this I simply duplicated the train buffer so that I had four in total with two at each end.


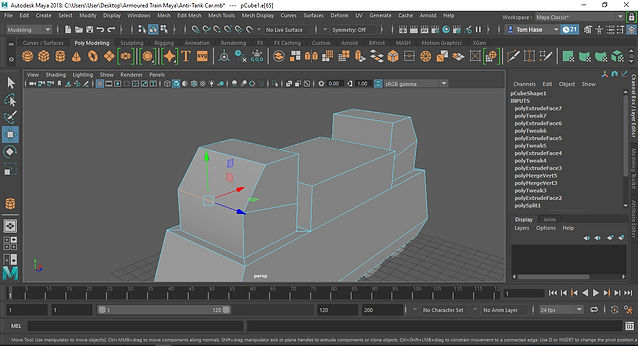
This step really extended the look of my carriage. I began extruding the sides of scaling faces around the carriage to illustrate that the armour was thick and bulky. I think that this process really enhanced the look of the car.
I did this for the whole carriage so that the armour looked more realistic and intimidating. Although this process did stir away from the original picture that I drew earlier I think that this definitely improved the look of it. I will be replicating this theme for the other carriages later on.


I then modelled the basic shape for the wheels of the carriage. As the wheels aren't as important as the main body I will keep these simple, not to mention during the animation the wheels will be mostly hidden throughout.
I added a small detail in the design of the wheels which was extruding the sides outwards and then using the move tool to put them in an upwards position so the wheels look tilted from the sides


Next I simply duplicated the wheel that I modelled for the other side and the back as well.
Another small detail I added was thin cylinders at the sides of the carriage. I created these for both sides.


The basic overall shape of the anti-tank car is now complete. As mentioned in beginning I will continue development of all carriages in the refinements/extra details section. However in the Maya sections following this one the aim to model the best basic overall shape of each of the carriages.
Maya - Command & Control Modelling
The second carriage to model is the command and control/locomotive car. By again referring to the concept art I created earlier I began with modelling the very basic shape of the carriage. This carriage has two parts to it, so the first part is longer than the second part as seen in the image on the right side.
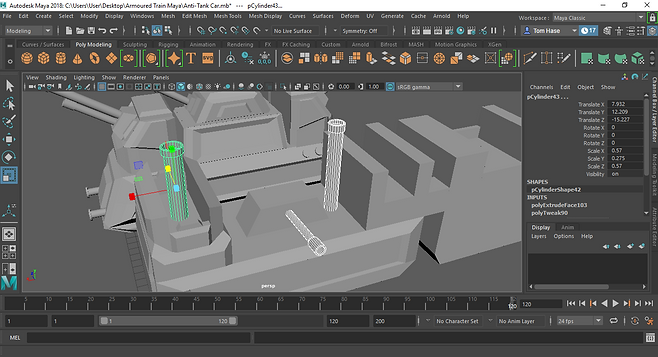
Next I used cylinders to create the long pipes that stick out at the top. I also used another smaller cylinder to create the small cannon pointing out at the side.
Now that the basic shape of the carriage was complete I then started modelling the smaller details of the car. As mentioned earlier the armour plating is a very feature of the cars to illustrate an intimidating look. The armour is what makes the trains stand out from normal ones.


A tool that I found helpful when creating this carriage was the bridge tool. This tool allows for two faces that are parallel from each other to have a extra mesh filled in between the two, therefore connecting them together.
I also worked on the second part of this carriage that holds the coal. I modelled it with a similar look as the first part with the thick armour plating.


In this part I modelled the connectors just like the anti-tank car. I had to ensure that it was the design as the connectors from the anti-tank car otherwise it could of caused problems with joining each carriage together.
I then duplicated it for both sides and also extended them to it could reach the connectors of the carriage in front of it.


In this image I simply added more detail to the part that connects the locomotive to the part that holds the coal for the train.
Just like the first carriage I modelled the wheels underneath. All wheels are the same for the carriages.

I then duplicated it for all the other areas respectively. This carriage had more wheels because it was in two parts.
This is the final outcome so far of the command and control carriage for my armoured train on the right side. I am very happy about how this carriage turned out because it needed the most detail.


This is what both carriages look like so far when connected to each other. It connects with the anti-tank carriage very nicely.
An issue I encountered when connecting both the carriages was ensuring that the connectors were long enough and also the right size. This is something I will look out for in the future.

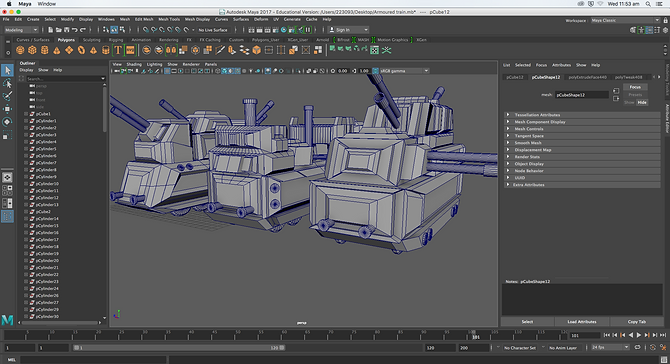
Maya - Anti-Aircraft Modelling

The next carriage to model was the anti-aircraft car. Again I began creating the basic shape initially. To me this carriage had to be slightly more complex than the anti-tank carriage as the anti-aircraft car was probably the most important role as the train was very vulnerable to aircraft as previously mentioned.
I then used cylinders to create the large cannons similar to the ones on the anti-tank carriage. So far I have used the same design for all the cannons on the carriages to save time.

After I simply duplicated these cannons onto the other areas of the carriage. Now you can see this carriage has the most cannons out of the six carriages I will be modelling. Again the large quantity of cannons empathises the important role of this carriage.
Like the first two carriages I used the same wheels for the anti-aircraft car.


After I began focusing on the smaller details of the carriage and also adding the armour plating. When I first began adding the armour to this carriage I wanted the plating to be similar to the plating on the anti-tank car however thicker armour on the base of the cannons for the anti-aircraft carriage.
I found that the armour plating design for this carriage was quite similar to the anti-tank car. Both these cars share similar features. Again at this stage I am continuing to work on the armour.


I then added four circular platforms on the sides of the carriage. This was a small detail I have added to all the cars so far.
Just like the other carriages I added the connectors to the front and back.


I had to ensure that these connectors were the right size and equal in length as the other connectors on the first two carriages in order for them to join to each other.
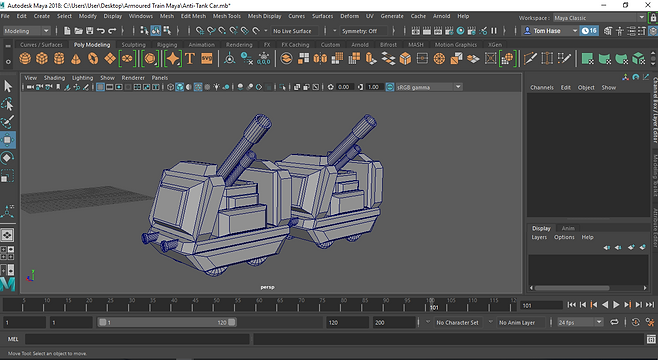
The anti-aircraft carriage was now complete and modelled. At this point I was happy with how the final design had turned out and I thought I did well with the armour plating.


Again I put all three carriages together to see what it looked like so far. When putting them together I thought that the train was now getting great shape.
Maya - Artillery (Version 1) Modelling
When creating my concept art I actually ended up drawing up two designs for my artillery carriages. I started by modelling the first design that I drew up as seen on the right side. This design was essentially a small cart with a cannon in the middle pointing to the side. In this design I had two connected to each other.

Now that the basic shape was complete I began added more details to the carriage like I have done with the previous carriages. The wheels were also added in.
I continued to add more armour plating to the carriage in the image. However the large cannons was the main focus of this model.

Like the other carriages I then added in the connectors by duplicating the ones from the other cars.
I then added the connectors for the back end of the carriage.

The artillery car is now complete. I simply duplicated the first one and attached it to the first one. In my opinion this wasn't very hard to model as it had a simple design to it but I like how this carriage is different from the other ones so far.
Maya - Artillery (Version 2) Modelling
This is the second artillery car I began modelling from my concept art as shown earlier. Again I modelled the basic shape of it first. The basis of this car is practically the same as the anti-tank and anti-aircraft carriages.


I then used cylinders to create the double cannons at the front. This carriage only has one main weapon overall.
I added the wheels as usual underneath the carriage. I also started adding more details.


When adding in the armour plating to the carriage I usually begin by extruding the sides with the scale tool to make it appear thicker.
I continued to add more details and armour to the front of the carriage as well.


After extruding the front slightly I added in the connectors at the bottom. I also duplicated them for the bac
The carriage was practically done and I think I did a well rounded job on the armour plating for the cannon area. The top of the carriage turned out to my liking.


The second version of the artillery carriage was now modelled. It turned out well and accurate to the concept art.
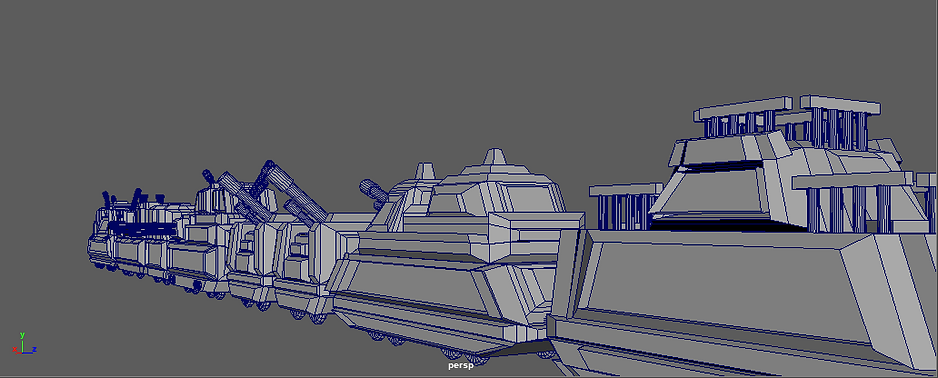
I have now modelled five out of six carriages. This is what they look like when all joined together. In the next sub-section I model the last carriage - the infantry car.
Maya - Infantry Car Modelling

For the last carriage I began again by creating the basic shape of it. The infantry car is probably least important out of all the carriages but will add a small bit of variety to the overall train.
I then started modelling the small side rails on top of the carriage by using four cylinders then a rectangular block on top of them. I then used the combine tool to parent all the meshes together into one. I did this so that I could duplicate the side rail later on for the other areas.

I then duplicated the side rails all around the top section of the carriage.
After I modelled the armour plating around the carriage as I normally would for the cars. Again this had a thick design to it.

I also ensured that the front of the carriage had thick looking armour plating to it.
Next I added the plating to the top, middle section of the carriage.


For the last part I added the usual connectors in front and back of the carriage.
This is now the final model for the infantry car. All six carriages are now complete.

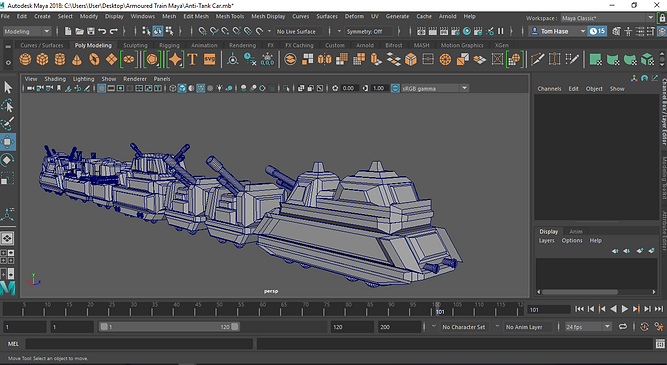
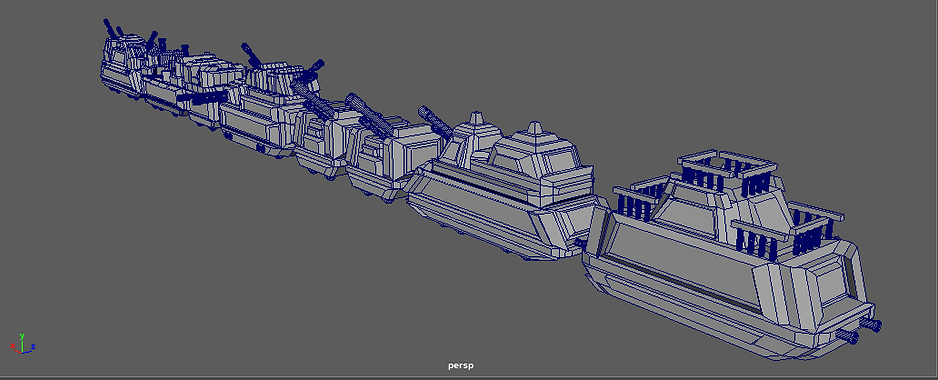
Maya - View Of All Carriages


Modelling Evaluation - Potential Improvements
My 3D armoured train model is now complete. In this small section I am reviewing certain areas that could possibly be improved. At some point I may not decide to do these changes if I think that it is already good enough.

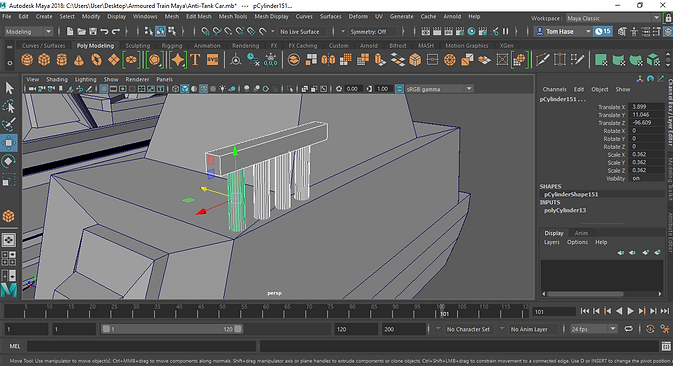
1. Extra Cannons
The first improvement or addition I will make is adding cannons to to the small rectangular spaces at sides of each of the carriages. In the left image you can see a wide rectangular space at sides of the cars I plan to add small cannons in the spaces so that this area can be filled.
2. Minor Details
The second change may not be too necessary but I might include small details such as handles, compartments and doors around the carriages. However I may not need to do this because I could create textures with these minor details on them.


3. More Bulkiness On Large Cannons
The third change I will make is to add more armour plating to the main cannons of the carriages. Right now I think they look too simple and could look better if more modelling was given to them.
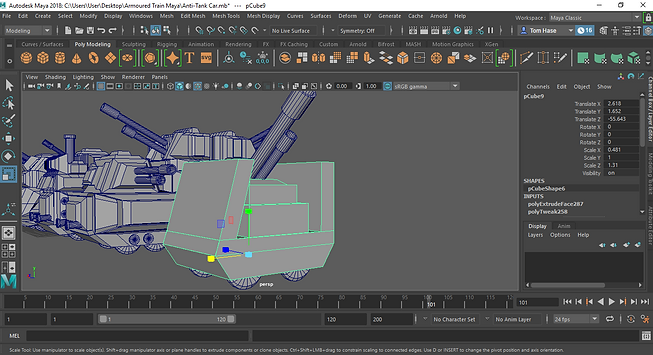
Unity - Environment/Basic Scene Creation
Although I still have other sections to complete such as the texturing and the making of the enemy vehicles I decided to create the basic environment of my scene in Unity and import the train in order to get an idea of what the end result may look like. After this section I will return to the modelling and texturing.
I modelled some basic train tracks for my scene so that the train can move along it. I then exported from Maya as a .fbx file to Unity so that it can be tested.


After I implemented both the train and the track into Unity I then had a basic idea of what the final animation may look like at an early stage.
I took some screenshots from Unity at various different angles of my train in the desert and then made a short render in iMovie with all the screenshots. This is a very basic and early concept of what the animation will look like when the train is in the scene.
Storyboard - Scene Explanation
This is my short storyboard of each camera angle of the animation, however there will enemy vehicles such as tanks, trucks and planes attacking the train whilst the train is also defending itself by attacking them. These shots don't show the enemy vehicles yet however the surrounding areas of each shot will be filled with enemy vehicles.

Maya - Enemy Vehicles Modelling

Tank
I will be modelling a WW1 tank to a basic degree. I found the most simple WW1 tank design from the Internet so that when I model it in Maya it would be easier to create. This will one of the enemy vehicles in the scene.
Air Plane
The second enemy vehicle I will mode is an air plane. I also tried to find a simple design of one to model in Maya later on. These will be flying over the train in the scene whilst attacking it.


Artillery Car
he third and final vehicle I will model is an artillery truck. I don't think that this will be that difficult to model and it has quite a boxy design.
Maya - Tank Modelling
I began by modelling the basic shape of the tank like I always would do. These vehicles are not the main attraction so I did not put much detail in it.


I then modelled the wheels and duplicated them.
I then applied a texture of a German Empire tank that I found online. Using the UV editor in Maya helped with adjusting it.

Maya - Artillery Car Modelling

I started modelling the artillery car with a boxy shape to it.
Once I had modelled the artillery car I then began texturing it and adding a camouflage texture, black tinted windows and the German Empire flag in front.

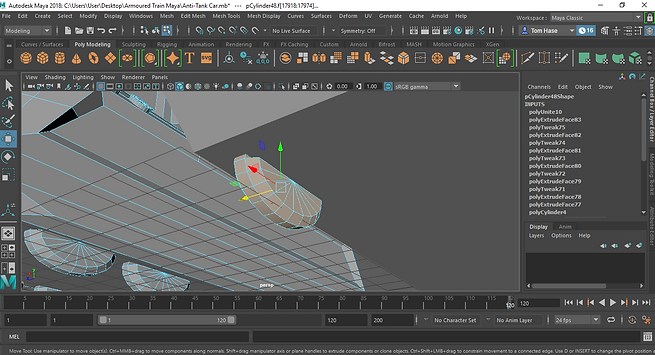
Maya - Fighter Plane Modelling

I used a reference image from the Internet to help me model the basic shape of the air plane.
I then added more detail to the plane. This model admittedly has a more complex design to it so I needed to add more details to it as opposed to the two previous designs.


I added applied a texture that I found online and adjusted it nicely to it the shape.
I decided to go back and re-adjust some details and re-model some areas of the plane.

Unity - Implementation Of Enemy Vehicles
All enemy vehicles are now completed with finished textures. I can now import them into Unity and begin arranging where I want them to be located in the scene and the quantity.

I imported all my models into Unity and applied the textures to them. I also adjusted the settings to give a more metallic look for the textures.
Unity - Camera Angle Examples
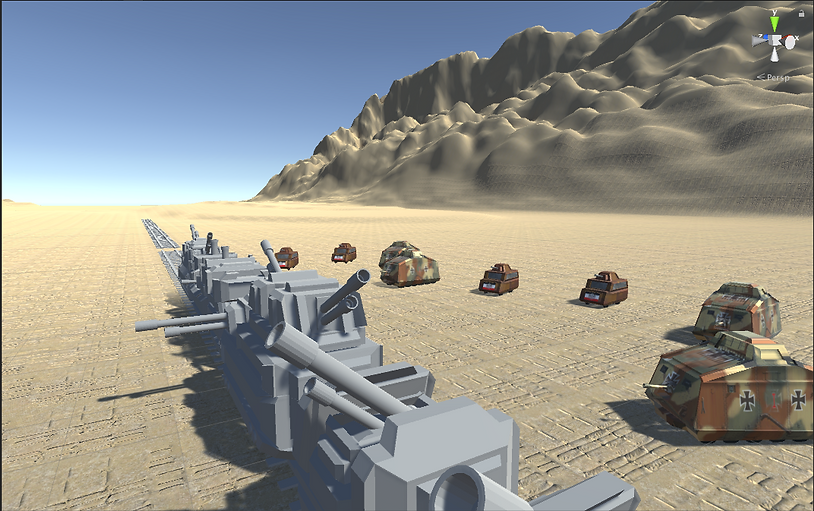
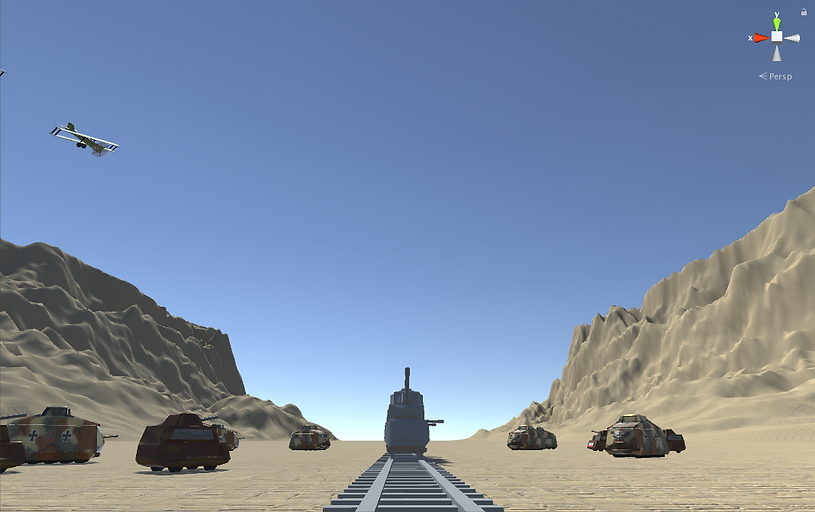
After importing the vehicles I duplicated and positioned them in the best place possible. I then took some screenshots to get an even better idea of what the final result will look like. Once the train is textured I will take some more camera angle shots.


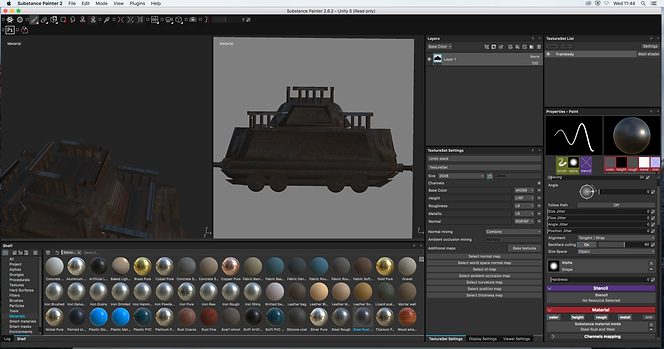
Substance Painter - Armoured Train Texturing
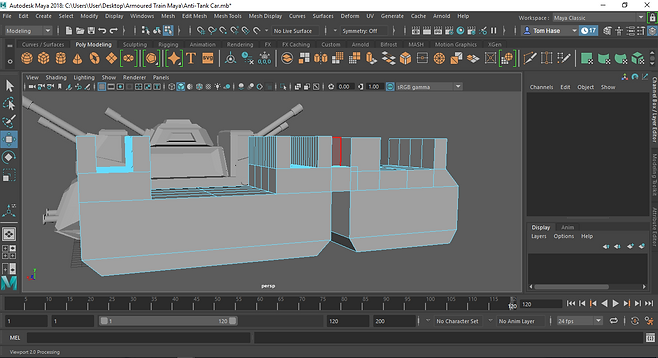
Although I should have done this stage earlier I am now texturing the armoured train for my animation sequence. I will be doing this in Substance Painter and texturing each train carriage individually. I exported each train car to an FBX file so I can begin the texturing process.

I want to texture my armoured train similar to the Battlefield 1 armoured train. I will have the main body of the train as a dark grey steel texture with some rustiness around the carriages.
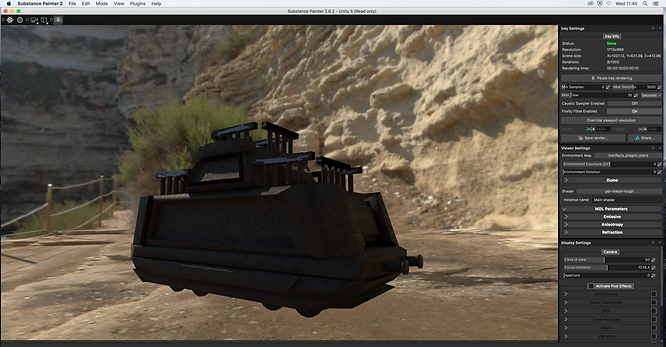
I began by applying a grey steel texture to the entire body of the train car. I started by texturing the anti-aircraft carriage first.


I then used a rust coating to create more dirtiness for the train. I changed the material colour to a dark grey so I could still retain the dirty look of the texture.
I continued to apply this texture around my whole train I also left some areas out so that I could apply different materials later on.

I then switched to a steel rust texture to colour all of the remaining areas which were left un-textured. Now the train texture has more diversity in its colours.
This carriage of my train is now complete. I will be texturing all my train cars with a similar style as this one.


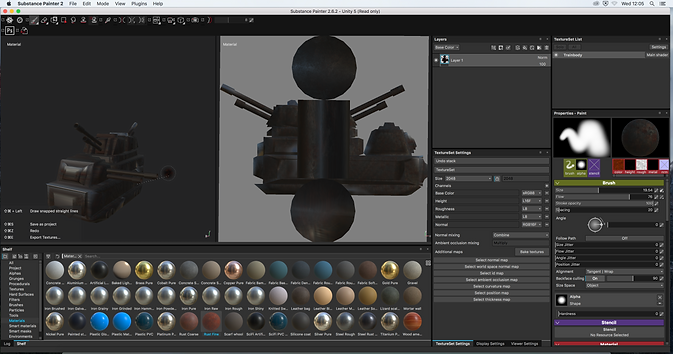
I then started texturing the anti-tank carriage. I tried to make this texture similar to the anti-aircraft car with the rusty material on it.
However I made this texture for the anti-tank car look more bright so that there was contrast.


I am happy with the final outcome of the the texture for this carriage I can now move onto the next carriage.
I then began with the third carriage which was the first artillery car.


I coated the entire carriage with this dark grey rusty material just like the other cars.
This was a quick texturing process as I now have a good idea of how I want my train cars to be textured. This is the final outcome of the artillery long carriage.


Next I started texturing the second artillery carriage. I decided to change the overall texture of this carriage slightly.
I textured the main cannons with a grey steel texture and then textured the outside of it a rust material like the other carriages so far.
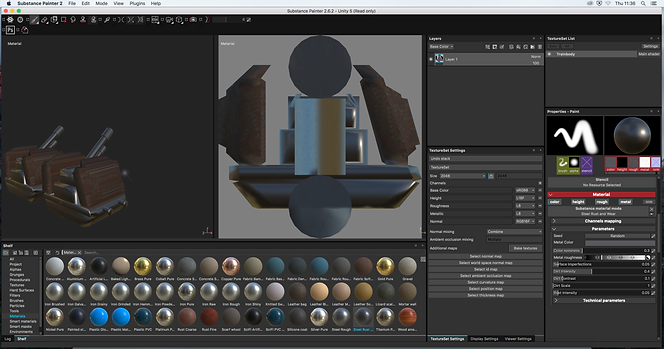

I now have the final outcome of the textured artillery car.
I imported the infantry carriage into Substance Painter and began applying the same style of texture to it.

I continued to paint over the carriage.
This car was not very difficult to texture, so this is the final result of it.

I then started with the last carriage which was the locomotive.
I selected a black texture with the same rust as the other carriages and applied it to this car. I also applied a steel grey texture to some areas of the locomotive.


All carriages are now fully textured and can now be exported to Unity.
Unity - Applying Train Textures
I have exported all the textures from Substance Painter into Unity and they can now be applied onto each of the train carriages. My aim was to produce and dark grey metal look for the entire train.

Maya/Unity - Animating The Train
I am now starting the process of animating the train moving down the train tracks. I duplicated the tracks all the way down to the end of the terrain for this stage.


I used the animation tab in Unity to create the straight movement of the train moving down tracks.
On the right side I have a video clip of the train moving down the tracks, I also animated a plane flying over the train in distance and a tank moving towards the track.
After Effects - Recording The Scenes
I have decided to record the scenes of my animation along side doing any animating within Unity. I did this by using the QuickTime Player to screen record each of my scenes from Unity. I then imported them into After Effects to put them all together.

I recorded the first three scenes of my animation and put them together in After Effects.
I then continued to add more clips that I recorded with multiple camera angles.

Final Render/Outcome
I have now finished my final outcome of my project. I have got all the recordings together and rendered them in After Effects. Then I found some music online and used Adobe Premiere to add the music in. Below is my final render.
Project Evaluation
Intentions
The aim for my project was to create an animation sequence of a WW1 armoured train battle scene in the Sinai Desert. The concept of my work was essentially developing a historic looking armoured train used in WW1 and have it travel along a desert scene whilst being attacked by enemy tanks and artillery cars. The context of my project was mainly doing a lot of research of the armoured train during WW1 and their uses, this helped me to model my armoured train in Maya. I do feel 100% I have met my initial intentions because I set out to create an animated sequence of an armoured train battle scene and I feel like I have successfully done that within Unity from the modelling to the animating process.
Research
I feel that my research was very successful as the large majority of it was pretty much learning about the armoured train during WW1. I managed to learn a lot about the armoured train such as their uses in warfare, strengths and weaknesses, media coverage, modern day uses and their discontinuation. The most relevant research of my FMP was probably researching the physical design of the armoured trains in WW1. I did this by learning about the history and development of the trains and various designs from several nations. I found that the Russian and Polish armoured trains intrigued me the most as they had many of them. This particular research inspired my project because I aimed to model my best version of an authentic WW1 armoured train and doing the research on its aesthetics contributed towards this. The most important and relevant things that I learned from completing my research was firstly learning about the various roles of the armoured train carriages as each separate car had different uses. The second thing would be creating the concept art for my armoured train model, this was important because I needed to have an exact representation of what I wanted my armoured train model to look like. In terms of my subject knowledge I relied on it a lot during the modelling process as in my opinion this was the most important step of the whole project, and knowing the skills in Maya helped me with developing my train model. In addition, my teacher gave me some advice with drawing the concept art before the modelling process.
Development
My idea development stage firstly began with, drawing armoured trains and then eventually creating actual concept art for my train. Then came the actual modelling which started modelling the basic shape of each carriage for my armoured train and then developing that and adding more details. I did this process for each of the carriages within Maya. The journey I went through whilst testing and experimenting was generally quite minor as doing this didn’t really play a huge part in my project. However, the small bit that I did do involved ensuring that my train was the correct scale and also adjusting its size so that its wheels aligned with the tracks in Unity. The testing and experimentation was linked to the research I did on video game references as I wanted my train to be inspired by the Battlefield 1 armoured train, which was researched. I would say that the idea development and experiments helped with the overall development of my project as the concept art specifically had to be done in order for me to model my own armoured train in Maya. Some issues arose with this stage as some details as doors and ledges proved too difficult to model onto some of the train carriages however I am very happy with the final outcome of my armoured train.
Methods of Working
I decided how I was going to create my final outcome when I viewed a trailer from Battlefield 1 online, involving an armoured train battle scene in the Sinai Desert during WW1. This game trailer inspired me to do something similar of my own. I worked before I began production on this that I wanted to use Maya to create my train, enemy vehicles’ and then use Unity for the animating of the scene and finally use Adobe After Effects to put all the scenes together. My methods of producing my work was firstly using Maya to model my armoured train, carriage by carriage. Then I modelled the smaller/minor enemy vehicles in Maya too. After that I used Unity to direct my overall scene and using the built in animation tools to bring the scene to life. I then used the camera in Unity to make separate recording of various camera angles and different things going on during my battle scene. After recording all of these I put them together within in Adobe After Effects for rendering. My choice of methods directly answers my statement of intent as these were the process I was going to originally carry out. I would say that my methods of working were all successful in each stage however the only exception would be that I decided to do most of the animating within Unity. This may have been easier to do in Maya. The strengths of using Unity to animate however was that I would have to export the animated meshes from Maya into Unity later which was prove more difficult. The weaknesses of working this way was that using Unity to animate is less convenient than Maya. If I could change one of the methods, it might have been to work/animate the entire scene in Maya instead of Unity.
Final Outcome(s)
My target audience was always those who take an interest in the tactics used in warfare, more specifically the vehicles and in my case the armoured train. Those who like to see and authentic perspective of the Sinai desert campaign was always my intended audience. However, those wanting to view a war zone filled with action would also admire my project. The only way I expect my target audience to interact with my project would simply be viewing and enjoying its minor details. My project is meant to communicate bloodshed, authenticity and action towards my audience and that is what I intended to demonstrate with my project. I feel like my final project answers my original statement of intent exactly and I set out precisely what I wanted to do in the first place.
Reflection
I consider my project to be very successful including the blog and the final project as I set out to do exactly what originally wanted to do. After completing my final outcome, I got some feedback from my classmates. Overall they had a positive response, saying that I included some great camera angles of my train moving however the only negative was to perhaps animate the camera as some scenes showed some mouse shaking from myself attempting to record the scenes.
Project Management
I think that I planned my time relatively well as majority of the work was done in college however I modelled my entire armoured train whilst at home. I followed my timetable for most part but generally I took my time with each stage, instead of rushing it just to follow the timetable. I do not really think that time management was really an issue for me however perhaps I could have textured my train at an earlier stage and also allowed more time for the animating process.
Additional Development/Improvements
If I could re-work any section of my project it would be the texturing of my armoured train because I feel like if I put more time into that I could have made it look more authentic to its time. If I was given an extra ten weeks to work on my project, I would definitely put more time into the modelling of the enemy vehicles and make them look better. Also I would figure out a way of producing my audio for my animated sequence as well. Overall I feel that I did a very good job with my project.