
Unit 6 - Product Visualisation
Research - Visualizations
The task is to create a 3D object modelled in a realistic manner as possible. The product needs to be based on a real object, this will allow the creation of real textures and will test the ability to from real life. The object needs to be a real household object but it should be subverted in some way.

Product visualisation is a large industry; nowadays a product is almost always visualised in 3D before manufactured. The development of 3D printing has led to a surge of modelling in 3D; not only to see the product virtually but also to lead directly to creating a physical product.
My first idea/visualisation is a simple knife that is disguised as a comb. Many weapons and tools used for spying or stealth have normal household objects disguised. It has a very thin design to it and looks very basic, the comb has two parts to it so that the knife can be hide inside. As seen on the image the comb and handle are two separate parts, once the comb part is removed a knife is actually hidden within it. I would definitely consider this idea as my final product idea as it has a basic design to it. I could also consider other knives disguised as household objects such as the ones below.


My second product visualisation idea is a disguised firearm. On the right I have two different images of disguised firearms. One being a smartphone which is actually a pistol and the second one being a a flashlight that is actually a sub-machine gun. I also very much like these ideas as very basic objects are actually firearms. However this would be a lot harder to model in Maya compared to the disguised knives.


My third and final product visualisation idea is a clothing hanger that has a spiky line of metal at the bottom. I think that this idea is probably the most basic out of the three and may also be the easiest to model as well. The spiked metal isn't as disguised and hidden compared to the other ideas however it is quite create in my opinion. In terms of modelling this I don't think would be very difficult at all however modelling the spiked metal might be quite tedious.
Research - Modelling Analysis & Chosen Idea
For my chosen idea I have decided to model a firearm disguised as a blow-dryer. Although I did not mention this idea above, I used my second idea about disguised firearms to help me create this idea. I will model the blow-dryer using the image below as reference, however because this needs to be subverted I will add a trigger underneath to show that it is a firearm in disguise.
I will being modelling the top half of the blow-dryer first then I will work my way down to the creation of the handle and eventually the trigger. Creating the top half of it may be somewhat of a long process as curving it at the back could prove tedious. In general I curvy shape of the blow-dryer might take a while to model, however I plan to use the smooth tool within Maya to help with this process. I won't be making my blow-dryer exactly the same as the one in the reference image as I want to alter it slightly. Firstly I will be modelling the top of the blow-dryer until I have created a curvy shape. Then I will create a nozzle at front of as a separate mesh, this will act as a cover for the blow-dryer. Finally I will create the handle underneath including the trigger in front of it.

Maya - Modelling The Top Half

In the first step I simple used a cylinder to shape the back part of the blow-dryer. I then used the multi-cut tool in Maya to add more divisions into the mesh, therefore creating more polygons. I did this so I could more easily shape the top half.

By selecting this tool you now have a knife symbol as the cursor and when holding CTRL you can choose where you want to add the division.
The next thing I did was shaped the back area so that it could be brought inwards. Then I selected the polygons and extruded it outwards.


Then I used the smooth tool in Maya to help curve the overall structure. By clicking on 'Mesh' at the top and selecting 'Smooth', Maya will smoothen out all the edges on the mesh.

Maya - Modelling The Nozzle
The next part of the blow-dryer I modelled was the nozzle. I started modelling this by shaping a pipe first. I then used the same techniques as before withe the multi-cut tool and the divisions to help curve the nozzle. After I used the smooth tool just like in the previous step.


After modelling it I moved it onto the front of the back half.
Maya - Modelling The Handle
Modelling the handle of the blow-dryer was probably the most difficult part to model, considering it had a curvy shape it .
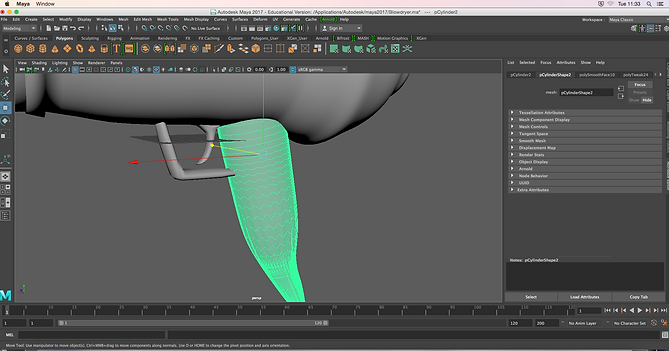

I used a cylinder to start with so I could eventually shape it to my liking. I mainly used the smooth tool to create the curvy shape of the handle.
Maya - Modelling The Trigger Guard
After modelling the handle I created the trigger guard fro the blow-dry. This is my way of subverting the blow-dryer.


I wanted my trigger guard to look the same way it would look like on a normal handgun as seen on the left. The trigger guard is squared off while being attached to the handle and top half of the of handgun.

Maya - Trigger Modelling
The next step is modelling the trigger of the blow-dryer. This turned out quite well in my opinion and I managed to curve and shape it well to look like a handgun trigger.

Maya - Texturing

After modelling the entire blow-dryer I applied shiny textures onto the mesh. When I assigned a new material I selected 'Blinn'. This will allow the texture to look shiny once applied.

Final Renders


Maya - Compositing

Compositing models in Maya is similar to photoshop where you can place a background behind your model. In this case I have placed my blow-dryer on the side and made it look as if it was actually put on its side in real life. The image is a real-life photo with my Maya model in it.
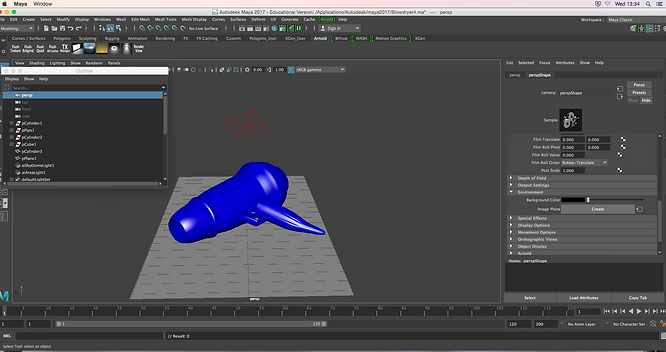
The first step is to click on the perspective camera in the outliner box at the left side. Then on the right side the camera settings will appear and you can click on create to add the image you want to use.

The next step is to assign a new material to the blow-dryer. You then have to select 'aiStandard' in the Arnold Shaders category. As seen in the right image on the side you can now select what colour you want and also change the weight of it.


Then you must change the transparency of the plane underneath the blow-dryer. So you assign a new material onto the plane and go to the Arnold Shaders again and select 'aiShadowCatcher'. Here you can enable the transparency.

After assigning the materials to the blow-dryer and plane. The next thing to do is to add an area light to the scene. This will simply just create more and intense light.


After you can render it in Arnold and adjust the gamma and lighting settings to your preference.
Project Evaluation
The theme of this project was to model a household object that is subverted in some way. In my case I decided to create a normal blow-dryer that is actually a gun (considering the trigger underneath in the images of it). I thought this project was quite similar to Unit 4 and 7 because I had to use most of the same techniques to create this blow-dryer.
The area of the project I enjoyed the most was the 3D modelling more specifically the the compositing part. I thought it was really interesting how my model could be placed within a real life photo and made to look as if it was actually there. I found this was similar to the compositing I did in Unit 1 with Photoshop.
New techniques I experienced was the digital compositing in Maya, although I have already learned how to do this in Photoshop in Unit 1, learning how to put my model into a real image with realistic shadows was new to me. In addition I learned how to make my textures in Maya look shiny by using the Blinn material on my 3D model.
The main aspect I researched through this project was how products are visualised in industries before the product is made in real life. The point of the Unit was to create this subverted object was realistic as possible, as if it was going to be created in real life for a company.
This aspect of the Unit influenced my project in the sense that I had to make my model quite high poly so that I could make it as realistic as possible and add more detail.
The technique that I enjoyed the most was probably using the smoothening tool in Maya for my model. This tool essentially makes your mesh curvier and more round, because I was creating a blow-dryer was tool was necessary.
The most successful part of my project was the final render for the compositing process. When rendering this I had constantly adjust the settings to change the intensity of the shadow of the blow-dryer model to fit the same shadow intensity of the objects in the background photo. After adjusting it to an intensity I thought was good enough the final render turned out well.
The problems I encountered in my project was probably at the beginning when I was trying to think of an idea for the unit. I learned from this problem as I was able to think of the blow-dryer/firearm idea by getting inspiration from other disguised firearms in my research. The only way this problem affected my project was in the sense that I had to discard previous ideas because they weren't original enough.
If I was given the chance to do something differently in the project I would probably find better textures for my blow-dryer model.