
Unit 7 - Freerunner
Unity - Game Level Development Techniques
The aim for this unit is to create a game level using the NYC rooftop that I developed in Unit 4. I will implement the rooftop into Unity and turn it into an interactive environment. Then I will create a first person camera that allows level navigation and set up the physics engine to allow interaction withe environment. It is going to be made so you can 'freeman' around the 3d space. The level will be professionally built as possible, also considering the game play. I will first be talking about the techniques I used to create a game level within Unity. then I will talk about my rooftop in Unity.


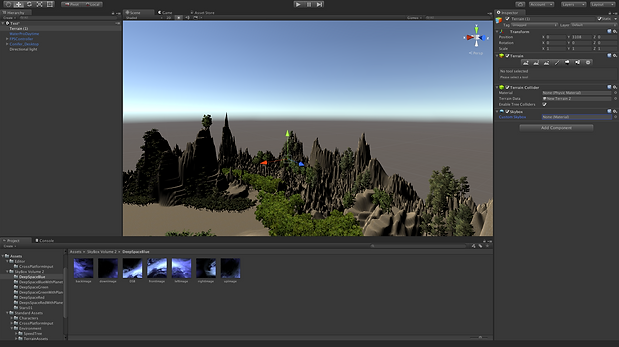
This is one of the environments I made in Unity. Unity has its own built-in terrain editor, which allows you to create levels with a variety of tools. The terrain that I made on the left was created by initially using brushes to modify and distort the terrain. I started using a basic plane in order to then further create the mountainous terrain. Unity has a variety of brushes that allows you to edit the environment in any way. I wanted a mountainous and rocky environment so I made sure I used brushes from the terrain editor that suited that purpose.

By clicking on the icon with a mountain and an arrow, you are able to raise and lower the physical terrain. As seen on the right I can raise it and lower it as high as I want it.

There are also a variety of brushes that can be used. In this case I used various brushes to make my terrain either spiky, smooth or rough. These brushes helped with creating a mountainous and rocky terrain.


You can also edit the overall colour/texture of the terrain. In this case I used a sand texture for my terrain. I can easily select a different texture by clicking ' Edit Textures' and selecting any of the available textures that are in Unity by default.


I can then add trees in the environment to make it more realistic by selecting the 'Place Trees' icon. I can then select and use any of the available trees given to me in the default Unity asset packages.

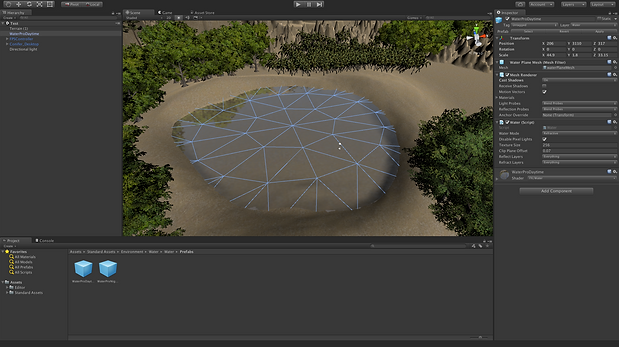


Another detail I can add to me terrain is water. I made mine by simply using the terrain raiser/lower tool as mentioned earlier and created a small, wide hole. I then used the 'WaterProDaytime' prefab, already supplied by Unity and dragged it into the hole that I created. The 'WaterProDaytime' prefab, gives the effect that the water is clear and still. A directional light shined above the water also allows you to see reflections in the water.
Unity - Skyboxes
Skyboxes within Unity are essentially materials that are used to change the sky within your scene. As seen on right image the skybox is just the default skybox given to you when stating up Unity. A way of changing it is to firstly go to 'Windows' and selecting 'Lighting'.


After opening the lighting box you must then select the skybox tab to change the material/colour. Then you are able to select whichever skybox you want.

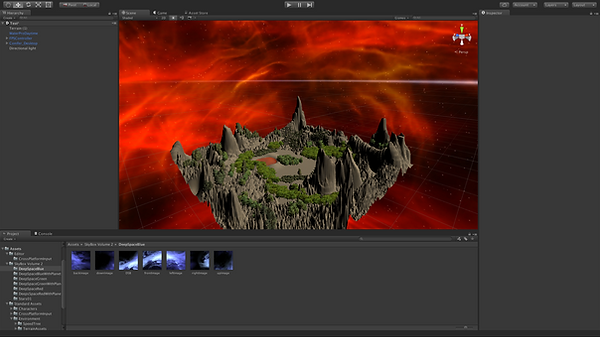
The skybox has now been changed and gives the illusion of a different sky. I got all my skyboxes from the Asset Store when I downloaded the Skybox Volume 2 Pack, which includes many skyboxes to use for free.

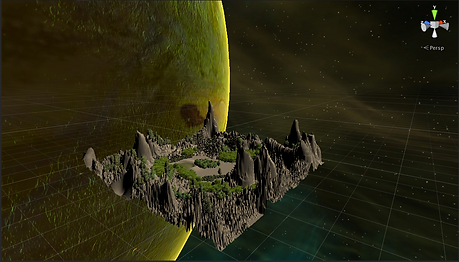
Here are some more examples of different skyboxes within Unity. Each of these skyboxes came from the Skybox Volume 2 pack, which I downloaded from the Asset Store. These ones are more space themed skyboxes.


Unity - Experimental Effects & Particles

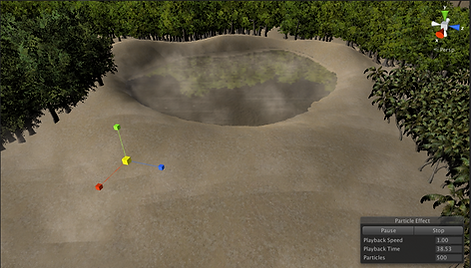
I experimented with the effects and particles that can be used in Unity. To use them I imported the ParticleSystems asset package that is provided by Unity. This gave me a range of different prefabs to use, such as fire, smoke steam..etc.


Whichever particle/effect you use it can also be adjusted even further by using the settings on right side. Settings such as the duration and scale can be changed. These effects and particles would useful when adding more detail to my NYC model, particularly the smoke, fire and steam. I used a dust storm in the image below


Unity - NYC Model Implementation
The next stage was to import my NYC model from Maya into Unity. As said earlier the aim of Unit 7 is to create a successful game level that can be tested while using the NYC model that was created in Maya from Unit 4. I managed to export the model into Unity however I may need to go back and re-create or edit some of the assets. As it needs to playable I have to re-scale some of the assets or re-make them first before I move on.

An important step before actually dragging the model into the Unity scene is to make sure 'Generate Colliders' is ticked in the import settings. This will ensure that the model is solid and the first person controller will not fall through the object.

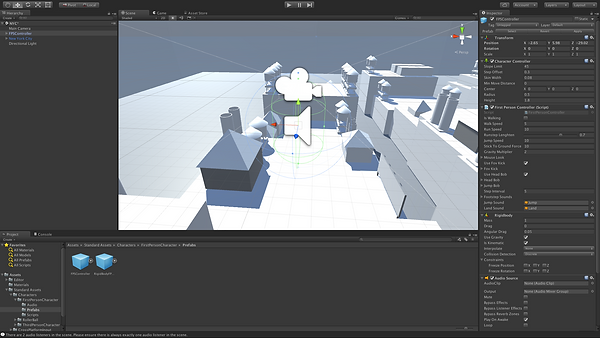


The next thing I did was dragged a first person controller into the scene. This is essentially the character that is used in the scene. I had to use the scale tool for the FPSController so that it was in proportion with the size of the NYC model. After that I had to scale the NYC model as seen on top image, so that the size was appropriate.


The next important step is to apply the textures to the NYC model. This can be done by simply importing all the used textures form the NYC model into the Unity materials section. Then you have to select each individual material and drag the correct texture onto the material. As a result the texture will be applied to the right part of the model.

This is what the textured NYC looks like in play with a working FPSController.
Maya - NYC Model Modification
As mentioned in the last section, I must modify my NYC model to some extent so all the assets within the model are the correct size and shape. The NYC model needs to be used as a playable level, so it must be the right size for the FPSController (character). I want all the duplicated buildings within my model to be connected to each other, so I will duplicate more bridges to connect the buildings together. My character should be able to access almost every place within my model. I will also need to adjust the size and shape of my NYC background that I placed surrounding my NYC model. I discovered that some of the buildings in the NYC background looked somewhat distorted as a result of the bending of the image. I will adjust this in Maya along with the sizes of the assets/buildings.


One way I can adjust the NYC background by using the basic tools in Maya like the move, rotate and scale tools. I select on each individual face of the background and I use the basic tools to adjust the size and position. I aimed to ensure the buildings did not look bent.

Unit 7 - Timeleap
Research - Past Events Analysis
The second part of this unit is to create/model a scene within Maya that is a merge between two different past events. I will firstly research 3 different ideas that include to past events from history. This section of Unit 7 is similar to the Unit 1 postcards project, however the aim is to model two past events. Below I have research 3 ideas that I could use when modelling in Maya. I have researched the history of all the events and chose specific dates that were the most appealing to me of that past event. In addition I summarised how I could model the scene in Maya if the idea was chosen.
The Battle of Ap Bac
1. Vietnam War & Chinese Communist Revolution
My first idea is the Vietnam War and the Chinese Communist Revolution. I chose the Battle of Ap Bac 1963 specifically because it was the first major battle during the Vietnam War. I chose the Chinese Communist Revolution because it played a major part in the Chinese Communist Party coming into power. More specifically I chose the may Fourth Movement because it showed power youthful support against the new Chinese government.
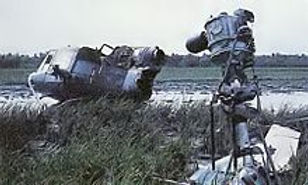
Fought on January 2, 1963, The Battle of Ap Bac was the first major battle fought during the Vietnam War. t was fought by the Army of the Republic of Viet Nam (ARVN) and the National Front for the Liberation of South Vietnam (NLF/Viet Cong) at Ap Bac, a village in Dinh Tuong province, approximately 50 miles southwest of Saigon on January 2, 1963. he battle resulted in heavy casualties on a much more superior South Vietnamese force, consisting of some 2,500 troops of South Vietnam’s 7th Infantry Division. The NLF lost 5 helicopters during the battle as shown on the left image. I plan to model a crashed helicopter surrounded by marshland.
The May Fourth Movement
The May Fourth Movement occurred on 4 May, 1919 and was a powerful youth movement against the Chinese government. The Treaty of Versailles gave Japan Chinese land that was taken by the Germans, but China felt that land was rightfully theirs. Chinese students of numerous universities then came together in a demonstration to protest both the Treaty of Versailles and the disputed land. The government responded by arresting people that were apart of the movement. This lead to a surge of nationalism within the nation, and many began to doubt the western world of democracy. This led to the founding of the Chinese Communist Party of China and the rise of Communism in China. I plan to model students rioting in Tiananmen Square.

2. The Berlin Wall & V2 Bombings of London
My second timeleap idea is the Berlin Wall and the V2 bombings of London after the Blitz. I chose the Berlin Wall because it showed the German public's views on communism and capitalism. I chose the V2 bombings of London because it was a devastating response by the Germans as revenge for the Allied bombings on German cities. It was also showed the military power and technology they had at the time.

The Berlin Wall
The Berlin Wall was a barrier that divided Berlin from 1961 to 1989. Constructed by the German Democratic Republic (East Germany), starting on 13 August 1961, the Wall completely cut off West Berlin from surrounding East Germany and from East Berlin until government officials opened it in November 1989. During the early years of the Cold War, West Berlin was a geographical loophole through which thousands of East Germans fled to the democratic West. In response, the Communist East German authorities built a wall that totally encircled West Berlin. It was thrown up overnight, on 13 August 1961. I can model the Berlin Wall with graffiti on it, and buildings either side to show that both sides are divided.
V2 Bombings of London
The V2 was assigned to attack Allied cities as retaliation for the Allied bombings against German cities. It occurred after the Blitz, and was in service from 1944 - 1952. When the V2 was first in service from September 1944, over 3,000 V-2s were launched by the Germans against Allied targets during the war, first London and later Antwerp and Liège. The attacks from V2s resulted in the deaths of an estimated 9,000 civilians and military personnel, and a further 12,000 forced laborers and concentration camp prisoners died as a result of their forced participation in the production of the weapons. As seen on the image on the right, the V2s caused a lot of damage to keys site of London. I can model the V2 itself crashing into buildings of London.

3. Korean War & The Spanish Armada
The third and final idea I have for my research of past events is the Korean War and the Spanish Armada. I chose the Chinese Spring Offensive or the Chinese Fifth Phase Offensive during the Korean War because it was the largest offensive operation the Chinese had conducted since the second phase in November and December 1950. I chose the Spanish Armada, more specifically it's defeat in July 1588 because the Spanish Armada was considered invincible at the time however the Queen Elizabeth managed to bring it down.

Chinese Spring Offensive
The Chinese Spring Offensive was a military operation conducted by the Chinese People's Volunteer Army during the Korean War. Mobilising three field armies totalling 700,000 men for the operation, the Chinese command conducted their largest offensive operation since Second Phase Offensive in November and December 1950. The operation took place in the summer of 1951 and aimed at permanently driving the UN forces off the Korean peninsula. The Offensive finally began on 22 April when the Chinese attacked the UN forces at the south bank of the Imjin River, a strategically crucial location heading a historic invasion route to Seoul. I can model the river surrounded by the mountainous terrain.
Defeat of the Spanish Armada
On July 21, the English navy began bombarding the seven-mile-long line of Spanish ships from a safe distance, taking full advantage of their long-range heavy guns. The Spanish Armada continued to advance during the next few days, but its ranks were thinned by the English assault. Just after midnight on July 29, the English sent eight burning ships into the crowded harbor at Calais. The panicked Spanish ships were forced to cut their anchors and sail out to sea to avoid catching fire. The disorganized fleet, completely out of formation, was attacked by the English off Gravelines at dawn. In a decisive battle, the superior English guns won the day, and the devastated Armada was forced to retreat north to Scotland.

Research - Modelling Analysis & Chosen Idea
Out of my three ideas I chose to use the Berlin Wall and the V2 bombings of London. I chose this idea out of the three because it was the easiest to model compared to the other three. When modelling this idea in Maya I plan to model the Berlin wall surrounded by common buildings of Germany at the time, but also include some known monumental buildings from London being destroyed by the V2s. Below I have more images of particular structures I will model. Considering I have already modelled my own version of New York City in Unit 5, modelling this idea won't be as difficult. I have analysed images and structures in order of which ones I will model first.

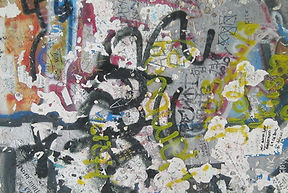
The Berlin Wall & Graffiti
I first structure I will model in Maya is the Berlin Wall with graffiti on it. On the left is a more modern photo of the Berlin Wall, but still shows how it separates East and West Berlin. The wall is quite long and stretches quite far, I will model the wall in the middle of the grid first so both sides of the wall is even. By modelling it in the middle of the grid it would be easier to create the buildings on either side.

Buildings & Structures
After I have modelled the Berlin Wall in the middle of the grid I will then model the buildings on either side of the wall. As seen on the right image a large grand structure is on the right side of the wall. I would assume this was government building or some other Soviet Union owned property, form the two red flags and single German flag. I will model this and also create other buildings surrounding it.


Buildings around London
In addition to modelling normal 1960s, German buildings I will also model buildings from London during the time the V2s were dropped on the city. I will either design parliament, half destroyed from the V2s or I will model other known London buildings at the time being destroyed from the German attack.


Destroyed London
On the right I have two images. One of normal London buildings being hit by the V2s and then buildings surrounding St Pauls Cathedral being destroyed. I will model either of them in Maya, however creating normal buildings being half destroyed would be easier.

Maya - The Berlin Wall

The first step is to create the basic shape of the Berlin Wall by using the interactive design feature to mark a rectangular shape on the grid. he wall has to be relatively thin so I can use the scale feature to adjust the length and width.

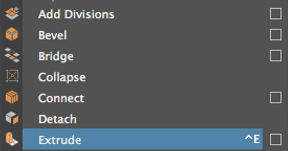
Later on I can extend the wall and make it longer by using the extrude feature.
The next step is to curve the top of the wall by using the bevel function above.

By clicking on the bevel function it then gives you options to change the fraction level and the amount of segments that the curve will include. The segments change the amount of edges and the fraction level changes the curviness.


Next I added more realism to the wall by creating a base underneath the wall. I did this by using the same process. I first selected the edges underneath the edges and then adjusted the settings to my liking. After I extruded the faces to create a triangular base. Finally I extruded the base again underneath.
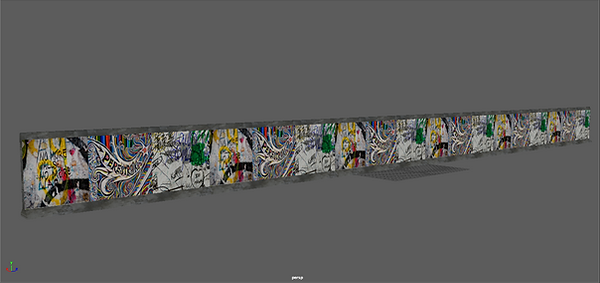
Next, I reduced the overall size of the wall and split it up into sections by duplicating the mesh. I did this so i can later on apply different textures onto the faces of the wall. I can also simply select all the faces on the side of the wall and then just extrude it to my preference.


I applied all the textures I wanted to use onto the faces of the wall. I used the UV planar to adjust the material on the wall. Sometimes when the material is applied onto the face the image is distorted, so you have to select the UV planar to fix it.


After creating the wall, the next step is to apply some textures onto the wall. I did some research into some of the graffiti sprayed onto the walls of the Berlin Wall at the time. I want to apply different graffiti onto the faces of the wall, depending on the views of the public. I wanted the graffiti on my Berlin Wall to show the oppression of dividing East and West Berlin.


Some of the images with text can sometimes be shown on the reverse side. So in order to fix it you can select 'flip horizontal' in photoshop. This will ensure that the image is correct positioned and the text is readable in Maya when the texture is applied.

The last step is to duplicate the original wall so that it can be connected to the end. I did this so the wall can be extended.


Final Renders - The Berlin Wall


Maya - Buildings Around The Berlin Wall

The next stage is to create the buildings around the Berlin Wall. How I plan to do this is to create around five different buildings and duplicate them on either side of the wall to save time, however I will texture each of them differently. I already have experience with creating buildings from the NYC project, however creating these buildings with require slightly more detail.
As seen on the right image I have created various different buildings and duplicated them. I altered some of them slightly such as the roofs are either straight or triangular. However I will need to scale the buildings so it is in line with the size of Berlin Wall.


I used similar techniques to create my buildings. Since I already have experience in modelling buildings from the NYC project so I used techniques likes extruding so create variety in the roofs of the buildings.

I then duplicated all the buildings I have created and moved them onto the other side of the wall. I will also alter these buildings slightly to create more variety in the scene. This side is meant to look more more like London about to be destroyed by the V2s.


Here I am slightly adjusting the buildings on the side of the Berlin Wall. I did this to create more variation.
Maya - V2 Rocket
The next stage is to model the V2 rocket. I will model this and position it, heading towards London. I did some research into the V2 rockets and found some reference images I can use when modelling it in Maya.I don't think that modelling the V2 rocket will be too difficult as I already know how to use the techniques to create it.


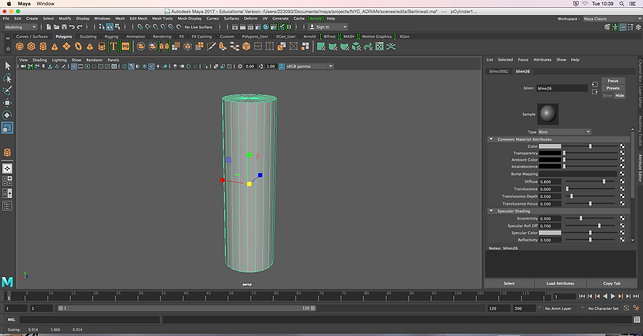
The first step is to simply create a cylinder by selecting the cylinder tool at the top. I had to make it relatively big and tall, so it would be aligned with the size of the buildings.


After I extruded the top of the cylinder I scaled it so I could create a cone on top of the overall cylinder. The nose of the rocket had to be quite pointy.

The third step is to extrude four faces of the base of the cylinder. This will be the tail of the rocket.
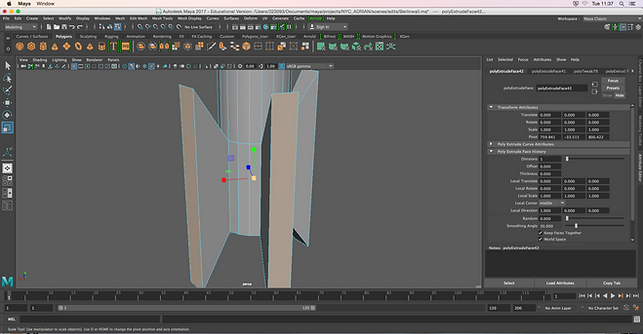

Next, I just used the basic tools to create the overall shape of the tail.

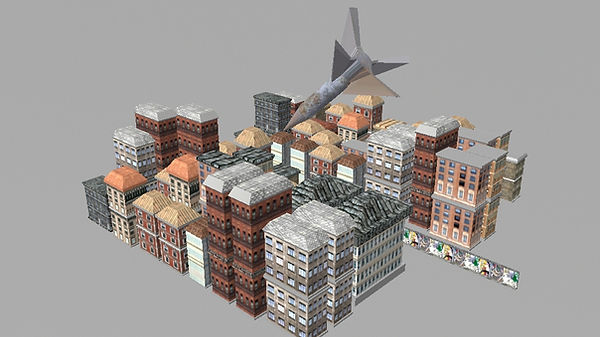
This is what the overall scene would look like once everything is finished. I want the V2 rocket in the sky about to crash down on the buildings.

Maya - Texturing

Next, is the texturing process. I began texturing the buildings first before anything else. I did some research into what 1960s - 80s buildings looked like and applied them to my buildings in the scene.
Here is the final model completely textured. I tried to add variety to all buildings as much as possible.

Final Renders


Unity - Model Implementation

The last stage is to simply export my model from Maya into Unity. I had to then scale the model so that the FPSController was in proportion with the size of the buildings. Just like the NYC project the aim is to be able to move around within the environment freely.
The model is now complete and has been put into Unity. In addition I added a street floor for realism.

Here is my playable model in Unity
Project Evaluation
The theme of my project (Unit 7 Timeleap) was the Berlin Wall and the V2 bombings of London. I chose the Berlin Wall because it showed the German public's views on communism and capitalism. I chose the V2 bombings of London because it was a devastating response by the Germans as revenge for the Allied bombings on German cities. It was also showed the military power and technology they had at the time. The part of the project I found the most interesting was the research of the Berlin Wall and V2 bombings of London because of their significance during history. I already knew the history of both events, however discovering the public’s views on the events was interesting to me.
Planning was a new technique I found very useful during this project. I found that having good research of the events and knowing exactly how I was going to model the project was very helpful.
The technique I would like to develop further would be adding more details into the 3D modelling side of the project.
The main aspect that I researched the most through this project was definitely the 3D modelling side of it. I put a lot of time in learning new ways of efficiently modelling the project.
By learning new effective ways of modelling in Maya it allowed me to make my project more realistic when modelling it.
The technique I enjoyed the most was a specific tool within Maya called the Bevel function. This technique allowed me to curve corners of my models and therefore add more realism to the project.
The most successful part of my project would be the research and planning I did before any of the modelling. I feel that my research in this unit is very extensive and detailed.
The only problem I encountered in my project was trying to think of ideas for my timeleap that go well together. However, I managed to overcome this problem.
I learnt from this problem as I when finally thought of my first timeleap idea I found that historical battles were the easiest to refer to when thinking of ideas. So, I researched some battles throughout history that appealed to me the most and used them as other ideas for my timeleap. The only way this affected my that it gave me slightly less time to work other areas of my project such as the modelling.
If I had the chance to complete the project again I would definitely spend more time into making sure I add as much details as possible into the modelling. I could do this by learning more modelling techniques within Maya.