Unit 2 - Research Skills
Primary & Secondary Research Sources
The main task is to create a villain and sculpt its face in Autodesk Mudbox. As well as this I did research into the human anatomy and how it functions in order to have a better understanding of the structure. I included both primary and secondary research to help design the villain better.


In this task I searched for a face in Google Images and put it in a white background in Photoshop. I then labelled various parts of the face such as muscles and ligaments. Each colour represents a important parts of the human face. I did this to identify all the details of the human face that would later help in sculpturing a face in Autodesk Mudbox in a later task.
This research will allow me to better manipulate parts of the human face when sculpturing. Even though the task is to create a villian face in Mudbox, understanding a normal face will help when distorting the shape.

In the next task I sketched two different perspectives of a human skull. The left drawing is the front view of the skull model and the right drawing is the side of view. The aim was to ensure the basic shape of the skull was created and all the important parts such as teeth and eye sockets were also sketched.
This task helped me identify the human face first hand. Drawing all the small parts on the side of the skull was quite tedious as the skull had a lot of details.

In this next task, I attempted to draw a real-life face to help me when designing my villain in Mudbox later on. I personally find drawing faces difficult as trying to make everything proportional and even can be hard. However I was able to draw the eyes evenly and draw the glasses the correct size.
This research also allowed me to recognise the parts of the human face better, similar to the skull exercise. Although my villain face won't really look like a normal human face and will be more distorted, this exercise did help me to understand the basic shape of the main parts of the human face.
Character Inspiration
Before I started creating and sculpturing my fictional villain I did some research into some known antagonists. I researched their back stories to better understand how fictional villain develop their evil characteristics. In addition I took note of their physical appearance to help me when sculpturing my own villain in Mudbox later on.

The main fictional character I used as inspiration for my villain was Two-Face from Batman. Two-Face, originally known as Harvey Dent was an amiable and courteous district attorney and one of Batman's strongest allies. However on a mission his face as thrown into acid causing half his face to be scarred. It also fractured his mental state, causing him to become Two-Face, a schizoid criminal mastermind obsessed with duality and the number two. I liked Two-Face's back story because he was initially presented as someone normal but then was later traumatised by a single event which changed his way of thinking to an evil state.
In terms of Two-Face's physical appearance I like how his face is has been scrapped off distorting the natural, circular shape of his head. I also like the small red markings on his forehead that show where the acid had burned into his skin. The big space around his right eye also shows how the acid destroyed the flesh around his eye.
The second character I used for inspiration for my villain was El Diablo from Suicide Squad. Even though in the film he didn't portray much of a villainous character he still has back story which transformed him form good to evil. He was originally known as Chato Santana and was an ex-convict who was placed on Death Row. The film explains that El Diablo killed his family which ended up traumatising him, resulting in his villainous character.
The difference with El Diablo is that he doesn't really have any monstrous deformities in his appearance, however the reason I researched him or inspiration was because the tattoos on his face do seem quite intimidating.
Two-Face's appearance presents how Harvey Dent turned from good to evil, very well. In my opinion it shows how one single event can completely traumatise someone psychologically.

Fictional Villain - Psycho (Backstory)
Name - Psycho
Michael was a normal 25-year-old man who offered to take part in an experiment to test areas of the brain that causes psychopathic behaviour. During this experiment Michael was put to sleep and his brain was tested upon. Many chemicals were used on Michael’s brain. After hours of testing, scientists were not able to achieve anything so they stopped the experiment. Michael was then woken up but due to all the testing and chemicals that were used on his brain it caused him to start fighting the scientists in the room. The chemicals used on Michael’s brain caused him to have a thirst for blood and as a result he violently slaughtered everyone in the lab.
Michael escaped the lab killing everyone unexplainably. For the next few days rumours and stories were occurring from people explaining that man with blood red eyes was murdering people randomly. He was nick named ‘Psycho’ because of his random killing of innocent people with no explanation.
Digital Sculpting - Villain Face
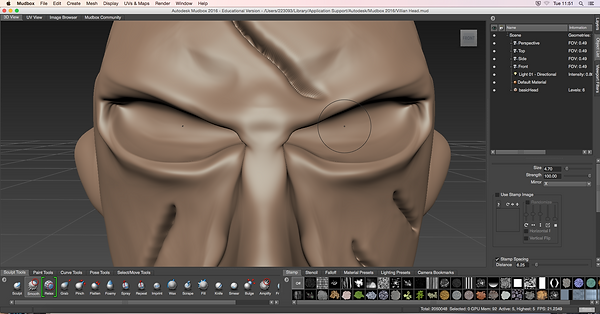
When sculpturing the villain I used a variety of tools in Mudbox to create it. I started by sculpturing the default head provided by Mudbox, then I began working on the neck area and gradually worked my way up to the face. The tools I used allowed me to initially create the basic shape that I wanted, then other tools allowed me to add more details to make the face more villainous.


The main tool used in Mudbox is called the grab tool. This tool is used to pull areas of the sculpture and drag/push them in the position needed. I used this tool the most when creating the eye socket and the neck area. The grab tool allowed me to push in areas of the neck to show muscles and tendons. In addition it allowed me to create the throat underneath the mouth.

The next tool I used was the pinch tool. I didn't use this tool very much but it did allow me to create the small spikes on the face and the neck. The pinch tool pulls a small area of the sculpture out until it creates a pointy shape at the top. The difference between using the grab tool and the pinch tool is that, the pinch tool pulls out the mesh making it smaller and smaller until there is a single point.


The scrape tool was used mostly for scraping the face to create a more realistic look. I wanted my villain to have a more rough look as he kills unexplainably, so the scrape tool allowed me to create markings on the face. In addition the scrape tool allowed me to create wrinkles on the face to present a more monstrous look. The faint markings on the face illustrate the character's toughness.

The smooth tool was another tool that wasn't used very extensively, but did allow me to soften areas of the face. I used this tool mostly after creating the eyes with the grab tool, as it gives a smooth, soft look to them. I also used the tool when smoothening the edges of the eye sockets. The smooth tool mostly helped me when making mistakes because it could change the shape of the sculpture quickly.


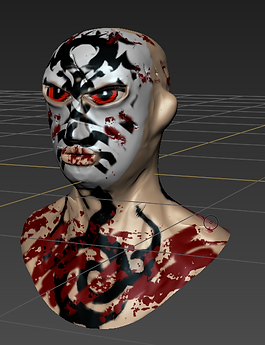
The next tool I used was the knife tool to create the long, thin holes on the face as seen in the picture. Part of Psycho's back story is that chemicals were used on him during an experiment, so the marks around his face/head present the psychological damage. In addition they show his psychopathic behaviour as his kills innocent people for no reason. The knife tool helped to demonstrate these.

The projection tool is an important technique used to texture or add colour to the sculpture. I wanted my villain to look as if he murders people viscously, so I add to the chest and also on the head where the cuts were. I then added a white face paint to create intimidation to his appearance. Then I researched some tattoos add projected them onto the face, chest and back to illustrate Psycho's tough character.


The process of using the projection tool requires me to firstly find an reference image of what I want to project (ideally a .PNG image as it has a transparent background). In this case I use a blood image to project it onto Psycho's chest and back.
By using a reference image, a stencil in the form of blood appears on top of the sculpture. As a result of this it allows me to brush/paint on the blood markings of the chest. By holding ALT and LEFT CLICK I was able to view the sculpture of a different angle, while the stencil sill moves around the sculpture.
I repeated this process with the tattoos, what face paint, skin colour and red eyes. As said earlier I wanted the tattoos to represent Psycho's tough character, however the reason I used these specific images for the tattoos was because I wanted it to show his psychological damage. Such intimidating tattoos show the damaged mental health state and insanity.

Final Images